Your Patio Is Dirtier Than You Think — Here’s What to Do About It
Pressure wash patio surfaces are one of the fastest ways to remove years of built-up grime, mold, and stains from your outdoor space. Here’s a quick overview of how to do it right:
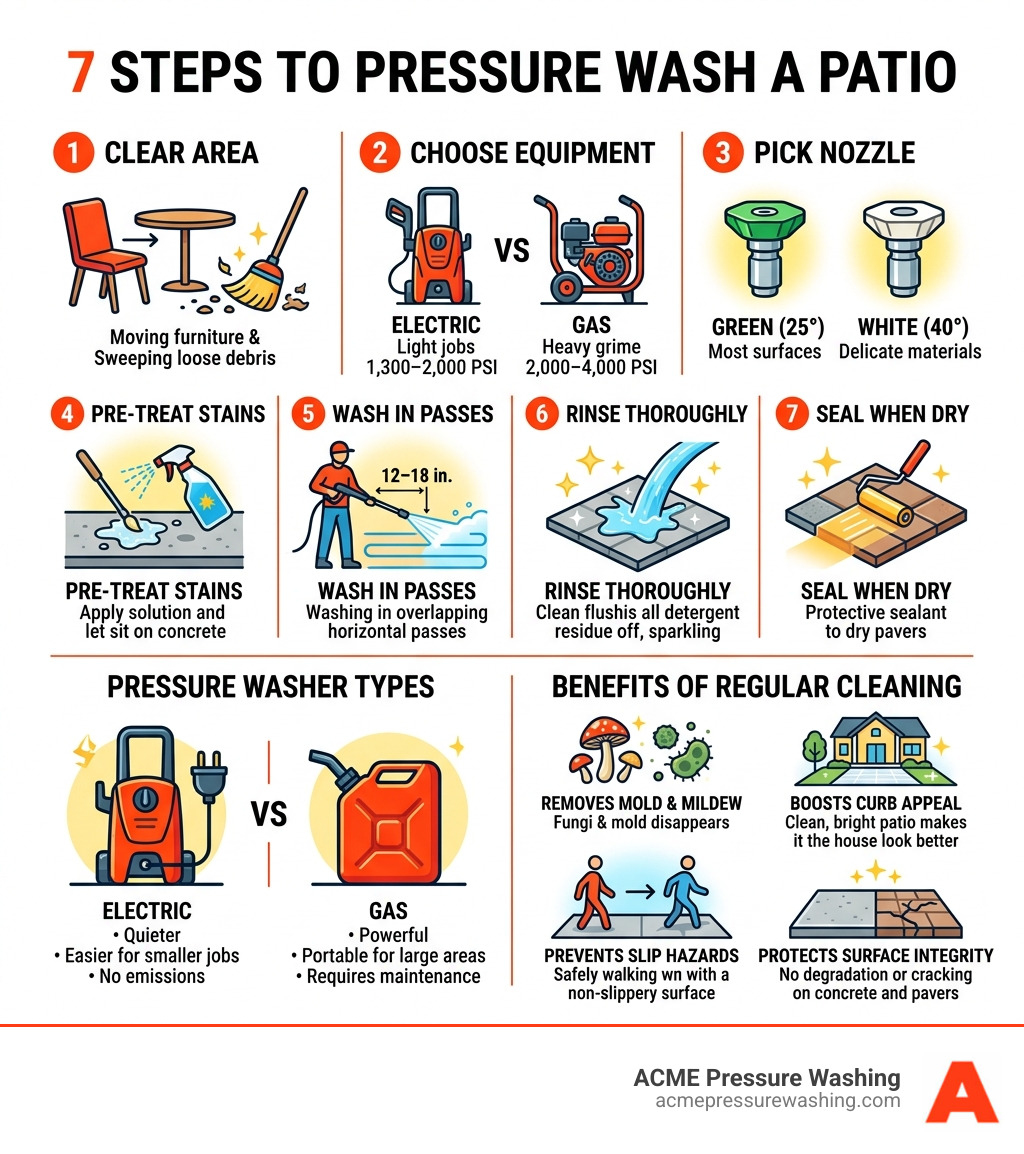
- Clear the area — remove furniture, sweep loose debris
- Choose the right equipment — electric (1,300–2,000 PSI) for light jobs, gas (2,000–4,000 PSI) for heavy grime
- Pick the right nozzle — green (25°) for most surfaces, white (40°) for delicate materials
- Pre-treat stubborn stains — apply a biodegradable cleaner and let it sit 10–15 minutes
- Wash in overlapping passes — hold the wand 12–18 inches from the surface
- Rinse thoroughly — remove all detergent residue
- Seal when dry — protect pavers and concrete from future staining
Your patio takes a beating. Rain, shade, foot traffic, and New England winters create the perfect conditions for mold, mildew, algae, and deep-set grime to take hold — fast.
Left untreated, that buildup doesn’t just look bad. It can actually degrade your patio surface over time, eating into concrete, loosening grout between pavers, and making surfaces dangerously slippery.
The good news? A pressure washer can transform a grimy, green-stained patio into something that looks almost new — often in just a few hours.
But there’s a catch. Using the wrong pressure, nozzle, or technique can cause real damage — etching concrete, stripping grout, or splintering wood. Knowing what you’re doing before you pull the trigger makes all the difference.
This guide covers everything: equipment selection, surface-specific techniques, safety, costs, and when it makes sense to call in a professional.
Understanding the Basics: Pressure vs. Power Washing
Before we dive into the “how-to,” we need to clear up some common confusion. Many people use the terms “pressure washing” and “power washing” interchangeably, but in professional exterior cleaning, they mean very different things.
The main difference is heat. A power washer uses a heating element to blast hot water, which is incredibly effective for melting away grease, oil, and chewing gum. Think of it like washing greasy dishes in the sink—hot water just cuts through the gunk better. However, for most residential patios in Amherst or Merrimack, standard cold-water pressure washing is more than enough to handle organic growth like moss and algae.
There is also a third method called “soft washing.” This uses very low pressure combined with specialized cleaning solutions to kill mold and mildew at the root without risking damage to delicate surfaces.
| Feature | Pressure Washing | Power Washing | Soft Washing |
|---|---|---|---|
| Water Temp | Cold | Hot | Cold/Warm |
| Pressure (PSI) | High (2,000–4,000) | High (2,000–4,000) | Low (<1,000) |
| Best For | Dirt, mud, bird droppings | Grease, oil, gum, salt | Algae, moss, delicate stone |
| Risk Level | Moderate | High | Low |
For a deeper dive into these technical differences, check out this complete guide to patio pressure washing.
Choosing the Right Equipment to Pressure Wash Patio Spaces
When you decide to pressure wash patio areas, the first hurdle is the machine itself. You generally have two choices: electric or gas.
- Electric Pressure Washers: These are usually quieter and lighter. They typically produce between 1,300 and 2,000 PSI. They are great for small patios or light cleaning, but they might struggle with 20 years of deep-set New England grime.
- Gas Pressure Washers: These are the heavy hitters, producing 2,000 to 4,000 PSI. They offer more mobility since they aren’t tethered to an outlet, but they require more maintenance (oil changes, fuel stabilization).
The “secret sauce” of a successful clean isn’t just the machine—it’s the nozzle. Most machines come with color-coded tips that determine the spray pattern:
- Red (0-degree): A laser-like stream. Warning: Do not use this on your patio! It can slice through stone and cause serious injury.
- Yellow (15-degree): High pressure for heavy stripping. Use with extreme caution on concrete.
- Green (25-degree): The “Goldilocks” nozzle. It’s perfect for most pressure wash patio tasks, offering a balance of power and safety.
- White (40-degree): A gentle fan spray. Best for delicate stone or wood.
If you have a large flat area, we highly recommend a surface cleaner attachment. It looks like a mini lawnmower and uses rotating jets to clean a wide path evenly, preventing the “tiger stripes” often left behind by a standard wand. You can see examples of how these tools transform a space on our walkway and patio cleaning page.
Detergents and Eco-Friendly Cleaning Solutions
While water does the heavy lifting, the right detergent acts as a force multiplier. For patios in New Hampshire, where humidity can lead to rapid algae growth, a specialized cleaner is often necessary to kill the spores.
We always advocate for biodegradable, eco-friendly cleaners. These solutions break down naturally and are safer for your lawn and local wildlife. For heavy mildew, look for pH-neutral soaps that won’t etch natural stone. If you’re dealing with a particularly stubborn area, pre-treating with a mildew-specific solution and letting it dwell for 15 minutes can make the actual washing much easier.
As noted in the HireRush Blog, using a detergent can significantly speed up the process and help tackle those “black spots” that water alone might miss.
How to Pressure Wash Patio Surfaces Safely
Safety is not just a suggestion; it’s a requirement. A pressure washer is a powerful tool that can exert enough force to penetrate skin or send debris flying at high speeds.

Before you start, gear up. You should always wear:
- Safety Goggles: To protect against flying grit and detergent splash-back.
- Closed-Toe Shoes: Never, ever pressure wash patio stones in sandals. A split-second mistake can lead to a trip to the ER.
- Hearing Protection: Gas models can be quite loud.
When cleaning, maintain a consistent distance of 12 to 18 inches from the surface. Getting too close is the number one cause of surface damage. For more on the basics of safe operation, Angi provides a solid 6-step overview.
Essential Safety Steps Before You Pressure Wash Patio Materials
Preparation is half the battle. Before you even connect the hose, take these steps:
- Clear the Deck: Move all furniture, planters, and grills.
- Protect Electronics: Cover outdoor outlets and light fixtures with plastic bags and painter’s tape.
- Pre-Soak Plants: Wet down nearby bushes and flowers. This dilutes any detergent runoff that might land on them.
- Test a Spot: Always test your pressure and nozzle on an inconspicuous corner first. This ensures you won’t accidentally etch the surface where everyone can see it.
For more tips on prepping your space, read our guide on deep cleaning patio slabs.
Common Mistakes to Avoid
Even with the best intentions, DIYers often fall into common traps.
- Surface Etching: This happens when the nozzle is too close or the pressure is too high, leaving permanent “scars” in the concrete.
- Grout Displacement: If you blast directly into the joints of a paver patio, you will wash away the sand or grout that holds the stones in place.
- The 0-Degree Danger: As mentioned, the red nozzle is almost never appropriate for home use. It’s too concentrated and dangerous.
- Inconsistent Motion: If you don’t use long, sweeping, overlapping strokes, your patio will dry with visible streaks.
As the experts at V-TUF point out, keeping the wand at a 45-degree angle rather than pointing it straight down can help prevent some of these issues.
Material-Specific Techniques for Patios and Pavers
Not all patios are created equal. A technique that works for a rugged concrete driveway could ruin a delicate natural stone walkway.
- Concrete: Generally the most durable. It can handle higher PSI (up to 3,000), but you still need to be careful not to “cream” the surface (stripping the top layer of smooth cement to reveal the rough aggregate underneath).
- Brick: Bricks are porous and can be surprisingly soft. They are also prone to moss in the mortar joints. Use a wider nozzle (25 or 40 degrees) and avoid high pressure on the mortar.
- Natural Stone (Flagstone, Slate): These materials can “flake” if hit with too much pressure. A soft wash approach is often best here.
- Wood Patios/Decks: Always wash with the grain. Going against the grain or using too much pressure will cause the wood to splinter, requiring a massive sanding job later.
According to All Washed Up, understanding these material nuances is the key to a “spring transformation” that lasts.
Best Practices for a Pressure Wash Patio Project by Material
If you are working with pavers, you must be prepared for “joint stabilization.” Pressure washing often removes the polymeric sand between pavers. This sand is what keeps the pavers from shifting and prevents weeds from growing.
Pro Tip: After the patio is completely dry (usually 24-48 hours), you should sweep new polymeric sand into the joints to ensure they stay locked in place. You can see the results of professional-grade joint stabilization in our gallery of walkway and patio cleaning.
Post-Cleaning Maintenance and Sealing
Once your patio is sparkling clean, you want to keep it that way.
- Sealing: For concrete and pavers, applying a high-quality sealer is the best defense. It creates a barrier against oil stains, salt damage, and UV rays.
- Weekly Sweeping: Don’t let leaves or grass clippings sit on the patio. As they decompose, they release tannins that can leave stubborn brown stains.
- Weed Inhibition: Keeping those joints filled with sand is your first line of defense against weeds.
For a full list of maintenance services, visit our walkway and patio services page.
The Cost to Pressure Wash Patio Areas: DIY vs. Professional
When considering the cost, it’s important to look at the “internet data averages” for 2026. Prices can vary wildly based on the size of the patio, the material, and the level of grime.
Based on national data, professional pressure washing for a patio typically ranges from $80 to $500, with a wide range for larger or more complex jobs reaching up to $1,500. Most homeowners find themselves spending around $250 for a standard-sized space. Professionals often charge by the square foot (typically $0.10 to $0.50) or an hourly rate ($80 to $140 per hour).
For a detailed breakdown of what to expect, Royal Pressure Washing offers a great guide on pricing and tips.
Evaluating the DIY Investment
If you decide to go the DIY route, here is a quick look at the potential costs:
- Purchase: A decent residential pressure washer will cost between $100 and $1,000.
- Rental: Expect to pay $35 to $175 per day at a local hardware store in Nashua or Derry.
- Supplies: Detergents, safety gear, and polymeric sand can add another $50 to $100.
- Time: A typical patio takes a DIYer about 2 to 4 hours, not including setup, cleanup, and the learning curve.
While DIY can save money upfront, the risk of property damage or personal injury is real. Often, the cost of a professional service is comparable to the price of renting equipment and buying supplies for a weekend. You can explore our full range of professional services to see if it’s the right fit for you.
Frequently Asked Questions about Patio Cleaning
How often should I clean my patio?
In New England, we recommend a thorough cleaning every 12 to 18 months. Our humid summers and harsh, salt-filled winters mean grime builds up faster here than in other parts of the country. If your patio is heavily shaded by trees, you might even need a light wash every 6 months to keep algae at bay. This is often done in conjunction with house pressure washing to keep the whole property looking sharp.
Can I damage my patio with too much pressure?
Absolutely. High pressure can etch concrete, strip the finish off wood, and blast out the sand between pavers. The key is using the right nozzle (stay away from the red one!) and maintaining a safe distance. If you see the surface changing texture or “fuzzing,” stop immediately—you are using too much pressure.
What is the best time of year for patio washing?
The “sweet spot” is spring (April to June) or early fall (September to October).
- Spring: Cleans away the salt and grit from winter so you can enjoy the patio all summer.
- Fall: Removes the summer’s dust and pollen before the leaves fall and stain the surface. The most important factor is the temperature—it must be at least 40 degrees Fahrenheit to ensure the water doesn’t freeze in the lines or on the surface, which can cause cracking.
Conclusion
A clean patio is the heart of your outdoor living space. Whether you’re hosting a summer BBQ in Hollis or enjoying a quiet morning coffee in Bedford, a grime-free surface makes all the difference. While DIY is an option for some, the risks of damage and the sheer physical labor involved lead many New Hampshire homeowners to seek professional help.
At ACME Pressure Washing, we bring over 38 years of experience to every job. Based in Merrimack, NH, we pride ourselves on using safe, customized, and eco-friendly techniques that protect your investment while delivering a deep clean that DIY machines simply can’t match. We serve a wide area, including Amherst, Auburn, Bedford, Brookline, Derry, Goffstown, Hollis, Londonderry, Manchester, Milford, Mont Vernon, Nashua, New Boston, Wilton, and Windham.
Ready to see your patio transformed? Schedule your professional patio cleaning today and let us handle the grime!
Your Paver Patio Deserves More Than a Quick Rinse
Paver patio pressure wash done right can restore your outdoor space from grimy and green to clean and sharp — but done wrong, it can cause serious, costly damage.
If you’re looking for a quick answer on how to approach paver patio cleaning:
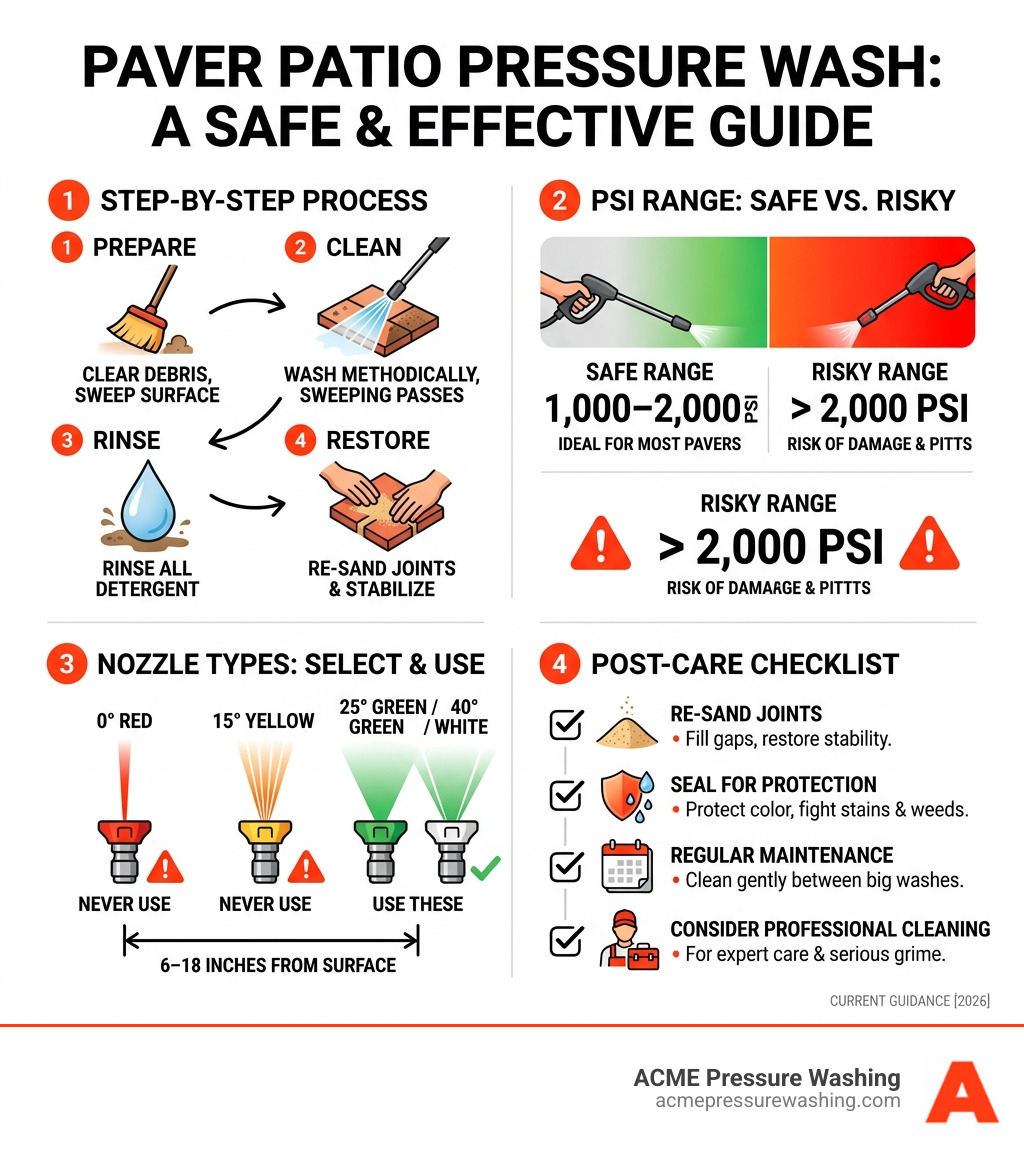
- Use 1,000–2,000 PSI — never exceed 2,000 PSI on pavers
- Choose a 25° or 40° fan tip nozzle — never a 0° or 15° tip
- Keep the wand 6–18 inches from the surface at all times
- Work in steady, sweeping passes — don’t linger in one spot
- Re-sand the joints after washing to restore paver stability
- Seal every 2–5 years to protect against stains, weeds, and freeze-thaw damage
- When in doubt, hire a professional — especially for delicate stone or heavy staining
Here’s the reality most homeowners in Merrimack, NH find out the hard way: pavers are not like concrete. They’re softer, their surface holds color through a thin layer of fine particles, and their joints rely on sand that a pressure washer can blast right out. One wrong nozzle, one moment of holding the wand too close, and you’re looking at etching, pitting, or a patio that shifts underfoot.
This guide walks through the most common DIY mistakes — and why professional paver cleaning is often the smarter, safer choice.
The Risks of Improper Paver Patio Pressure Wash
When we talk about a paver patio pressure wash, we aren’t just talking about rinsing off some dirt. We are dealing with a complex system of masonry units held together by friction and joint sand. Many homeowners in towns like Amherst and Hollis assume that because their patio is made of “stone,” it can handle the same high-pressure blast as a commercial dumpster pad. This is a dangerous misconception.
One of the most significant risks is the destruction of “surface fines.” Concrete pavers are manufactured with a concentrated layer of fine particles on the surface to provide a smooth finish and vibrant color. High pressure can strip these fines away, leading to aggregate exposure. Once the larger stones inside the paver are exposed, the patio looks pitted, feels rough, and loses its original luster.
Beyond the aesthetics, there is the issue of structural integrity. As noted in Pressure Wash Pavers Without Destroying Them, the sand in the joints is what keeps your pavers from shifting. If you aim a high-pressure stream directly into those joints, you’ll blast that sand out. Without it, the pavers can wobble, tilt, or even sink over time.
Other common damages include:
- Etching marks: Using a narrow nozzle (like a 0-degree “red” tip) can leave permanent “scribble” marks on the stone.
- Pitting: High PSI can create small holes in softer materials like brick or sandstone.
- Color Fading: Stripping the top layer of the paver often removes the pigment, leaving you with a dull, greyish surface.
At ACME Pressure Washing, we’ve seen many DIY projects go south because the operator lingered too long on a single spot. To see what a professional, safe result looks like, check out our Walkway and Patio Cleaning service page.
Essential Equipment and Material-Specific Settings
To avoid the “horror stories” of pitted stone and ruined joints, you need the right tools. Most residential paver surfaces should never see pressure exceeding 2,000 PSI. In fact, for many natural stones, 1,000 to 1,500 PSI is the “sweet spot” for effective cleaning without destruction.
Recommended PSI and Nozzles by Material
| Paver Material | Recommended PSI Range | Ideal Nozzle Tip |
|---|---|---|
| Concrete Pavers | 1,500 – 2,000 PSI | 25° (Green) or 40° (White) |
| Brick Pavers | 1,500 – 2,000 PSI | 40° (White) |
| Flagstone / Slate | 800 – 1,200 PSI | 40° (White) |
| Sandstone / Limestone | 800 – 1,000 PSI | 40° (White) |
A 25-degree fan tip or a 40-degree nozzle is essential. These tips spread the water out into a wide “fan” shape, which reduces the impact on any single point. We also highly recommend using a walk-behind surface cleaner attachment. These tools use rotating nozzles housed under a deck to provide a consistent, even clean without the “tiger stripes” often left by a manual wand.
Before you start, don’t forget your safety gear. This includes safety goggles (sand and debris will fly), hearing protection, and closed-toe shoes. For a deeper dive into equipment selection, you can read more at Clean Pavers With Pressure Washer: A Complete Guide.
Safe PSI for a Concrete Paver Patio Pressure Wash
Concrete pavers are generally the heartiest of the bunch, but they still require a delicate touch. We recommend a range of 1,500-2,000 PSI for these surfaces. Because concrete pavers have a high surface density, they can handle enough pressure to lift deep-seated mold and algae, but exceeding 2,000 PSI risks exposing the aggregate beneath that smooth top layer.
In high-traffic areas like driveways or main walkways, the surface might be more durable, but the joints remain vulnerable. We always suggest checking out our Gallery Walkway and Patio Cleaning to see how we maintain that perfect balance of power and preservation on concrete surfaces.
Handling Delicate Natural Stone and Brick
Natural stone requires an entirely different strategy. Flagstone, for example, is often held together by mortar. High pressure can crack or wash away that mortar, leading to expensive repairs. We keep our equipment between 800-1,200 PSI for flagstone and slate.
Sandstone and limestone are even more porous and soft. Using too much pressure on these can actually “etch” the stone, creating a permanent texture change. If you have a slate patio, be aware of “cleavage planes”—the natural layers of the stone. Blasting water at a sharp angle can cause the stone to flake or delaminate.
Professional Techniques for a Flawless Finish
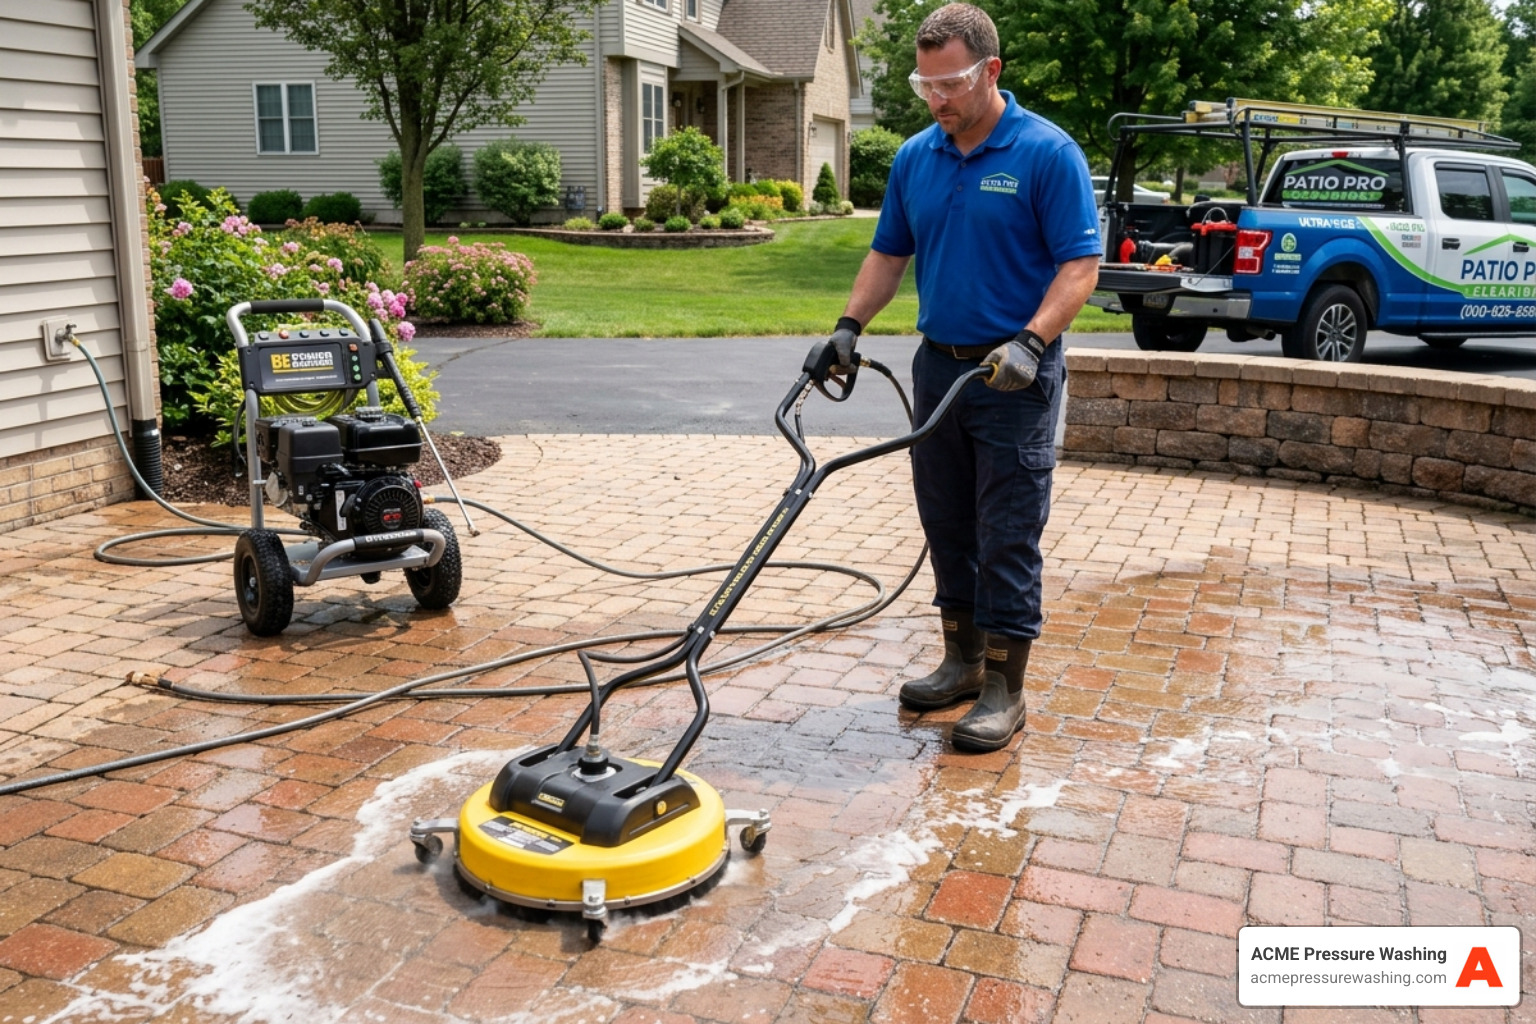
How you move the wand is just as important as the PSI setting. At ACME Pressure Washing, we use a specific “S-pattern” movement. This ensures that every inch of the patio receives the same amount of cleaning time, preventing streaks and “hot spots.”
Key professional techniques include:
- Wand Distance: Keep the nozzle 6 to 18 inches away from the pavers. Getting too close is the fastest way to cause damage.
- Angle of Attack: Hold the wand at a slight angle rather than pointing it straight down. This helps “sweep” the dirt away rather than driving it deeper into the pores of the stone.
- Working with the Slope: Always start at the highest point of the patio and work your way down. This allows the dirty water to drain away from the areas you’ve already cleaned.
- Drainage Management: Ensure your runoff isn’t pooling in your mulch beds or basement window wells.
For more tips on achieving a professional look, see our guide on How to Deep Clean Patio Slabs Without Breaking a Sweat.
Preparation Steps Before Your Paver Patio Pressure Wash
Preparation is 90% of a successful paver patio pressure wash. Don’t just pull the trigger and hope for the best.
- Clear the Area: Move all furniture, grills, and potted plants.
- Edge Trimming: Use a string trimmer or spade to clear grass and weeds that have encroached on the edges of the patio.
- Weed Removal: Manually pull large weeds from the joints. While pressure washing can remove some moss, it rarely kills the roots of deep-seated weeds.
- Sweep Debris: Use a stiff-bristle broom to remove loose dirt, leaves, and twigs.
- Protect Landscaping: Thoroughly pre-wet any grass or flowers surrounding the patio. This dilutes any cleaning solutions that might splash onto your plants.
Safe Cleaning Solutions and Detergents
Sometimes water alone isn’t enough, especially for oil stains or heavy mold. We recommend using eco-friendly surfactants and specialized detergents.
- Oxygen Bleach: Great for lifting organic stains (mold/mildew) without killing your lawn.
- Dish Soap: A simple mixture of Dawn and water is surprisingly effective for light grease stains.
- Specialized Degreasers: Necessary for grill drippings or oil spots on driveways.
- Avoid Muriatic Acid: Unless you are a highly trained professional, stay away from harsh acids. They can dissolve the surface of concrete pavers and permanently change the color of natural stone.
If you notice white, powdery stains on your pavers, that’s efflorescence. This is a natural mineral deposit that rises to the surface. Specialized cleaners are required to treat this without damaging the stone.
Post-Cleaning Care: Re-sanding and Sealing
The job isn’t done just because the pavers are clean. In fact, the most critical steps happen after the washing is finished. Because a paver patio pressure wash inevitably displaces some joint sand, you must replace it to maintain the patio’s stability.
Choosing the Right Sand
- Kiln-Dried Sand: Traditional sand that is swept into joints. It’s affordable but doesn’t offer much protection against weeds.
- Polymeric Sand: This is a “high-tech” sand infused with polymers (glues). When misted with water, it hardens to create a flexible, weed-resistant bond that locks the pavers in place.
For a step-by-step on the re-sanding process, check out How to Clean Brick Pavers with a Pressure Washer.
Why Post-Wash Care is Vital for Your Paver Patio Pressure Wash
If you skip re-sanding and sealing, you’re basically inviting the dirt and weeds back in within weeks.
- Weed and Insect Prevention: Properly installed polymeric sand creates a barrier that prevents seeds from germinating and ants from tunneling.
- Stain Resistance: A high-quality sealer acts as a “clear coat” for your patio. It prevents oil, wine, and leaf tannins from soaking into the porous stone.
- Color Enhancement: Many sealers offer a “wet look” that deepens the natural colors of the stone, making an old patio look brand new.
- Freeze-Thaw Protection: In New Hampshire, water that gets into paver pores can freeze and expand, causing cracks. Sealing prevents this moisture absorption.
We generally recommend a sealing cycle of every 2 to 5 years, depending on the type of sealer used and the amount of sun/traffic the patio receives.
When to Call the Experts for Patio Restoration
While many homeowners enjoy a DIY project, a paver patio pressure wash can be a massive undertaking. A typical 400-square-foot patio can take a DIYer an entire weekend when you factor in prep, washing, drying time (24-48 hours), re-sanding, and sealing.
Average Costs Based on Internet Data: Professional patio cleaning and sealing typically ranges from $150 to $2,500+.
- Small Patios (under 500 sq ft): Often fall on the lower end ($150 – $600).
- Large Estates or Commercial Plazas: Can easily exceed $2,500 depending on the level of staining and the type of sealer required.
You should definitely call a professional if you are dealing with stubborn lichen (those white/grey “crusty” spots), heavy oil stains, or if you have delicate natural stone. We use professional-grade steam cleaning and customized techniques that safely lift grime that consumer-grade pressure washers simply can’t touch. Learn more about our local expertise at Merrimack Exterior Cleaning from Patios to Fences.
Frequently Asked Questions about Paver Cleaning
How often should I pressure wash my pavers?
Most residential patios in New Hampshire benefit from a professional cleaning once or twice a year—ideally in the spring to remove winter salt and grime, and in the fall to clear away organic debris before the snow flies.
Will pressure washing remove the sand between my pavers?
Yes, it almost certainly will. Even with a fan tip, some sand displacement is expected. This is why re-sanding is a mandatory part of the restoration process. If you don’t replace the sand, your pavers will eventually shift and become uneven.
Can I use bleach to clean my paver patio?
You can, but you must be extremely careful. Standard laundry bleach can be harsh on certain natural stones and will definitely kill any surrounding vegetation if not diluted and rinsed properly. We prefer using oxygen-based cleaners or specialized masonry detergents that are safer for your “Morning Glories” and the local environment.
Conclusion
A beautiful patio is an investment in your home’s value and your family’s enjoyment. At ACME Pressure Washing, we bring over 38 years of experience to every job in Merrimack, NH, and surrounding areas like Bedford, Londonderry, and Nashua. We don’t believe in a “one size fits all” approach. Instead, we use safe, customized, and eco-friendly techniques to ensure your pavers are cleaned without the risk of aggregate exposure or structural damage.
Don’t spend your entire April weekend wrestling with a rental machine and bags of sand. Let the experts handle the heavy lifting.
Schedule Your Professional Walkway and Patio Cleaning with ACME Pressure Washing today and see the difference that 38 years of local expertise can make!
Why Your Patio Cushions Deserve a Power Wash
Many homeowners in Merrimack, NH, face the same challenge: enjoying their patio means battling grime, mold, and stains on outdoor cushions. You want to relax with a good book and a cold drink, but dingy cushions can quickly ruin the mood.
Can you safely power wash patio cushions? Yes, but with important precautions.
- Is it safe? Yes, if done correctly.
- Pressure settings: Use the lowest possible pressure.
- Nozzle: Opt for a wide-angle tip (like 40-degree or 65-degree) or low-pressure mode.
- Distance: Keep the nozzle at least 2 feet away from the fabric.
- Cleaner: Always use a fabric-safe cleaning solution.
- Caution: Never power wash delicate, dry-rotted, or visibly damaged fabrics.
It’s April 2026, and as the warmer weather arrives, your outdoor cushions are likely showing the signs of a long winter and busy seasons past. From kids and pets leaving grass stains to mildew thriving in humidity, your patio cushions take a beating. The good news is, power washing patio cushions can bring them back to life.
This guide will show you how to safely and effectively clean your outdoor cushions, transforming them from dingy to dazzling. You don’t need to replace them; you just need the right approach to cleaning. This method saves you money and prolongs the life of your outdoor furniture, making your patio inviting again.
Is Power Washing Patio Cushions Safe for All Fabrics?
When it comes to power washing patio cushions, the first question we always hear is: “Will this rip my expensive fabric?” It’s a valid concern. After all, a pressure washer is a powerful tool, not a garden hose.

Most modern outdoor fabrics, such as Sunbrella, are designed to be incredibly durable. These synthetic materials are solution-dyed, meaning the color goes all the way through the fiber, making them resistant to fading and tough enough to handle a deep clean. However, even the toughest fabric has its limits.
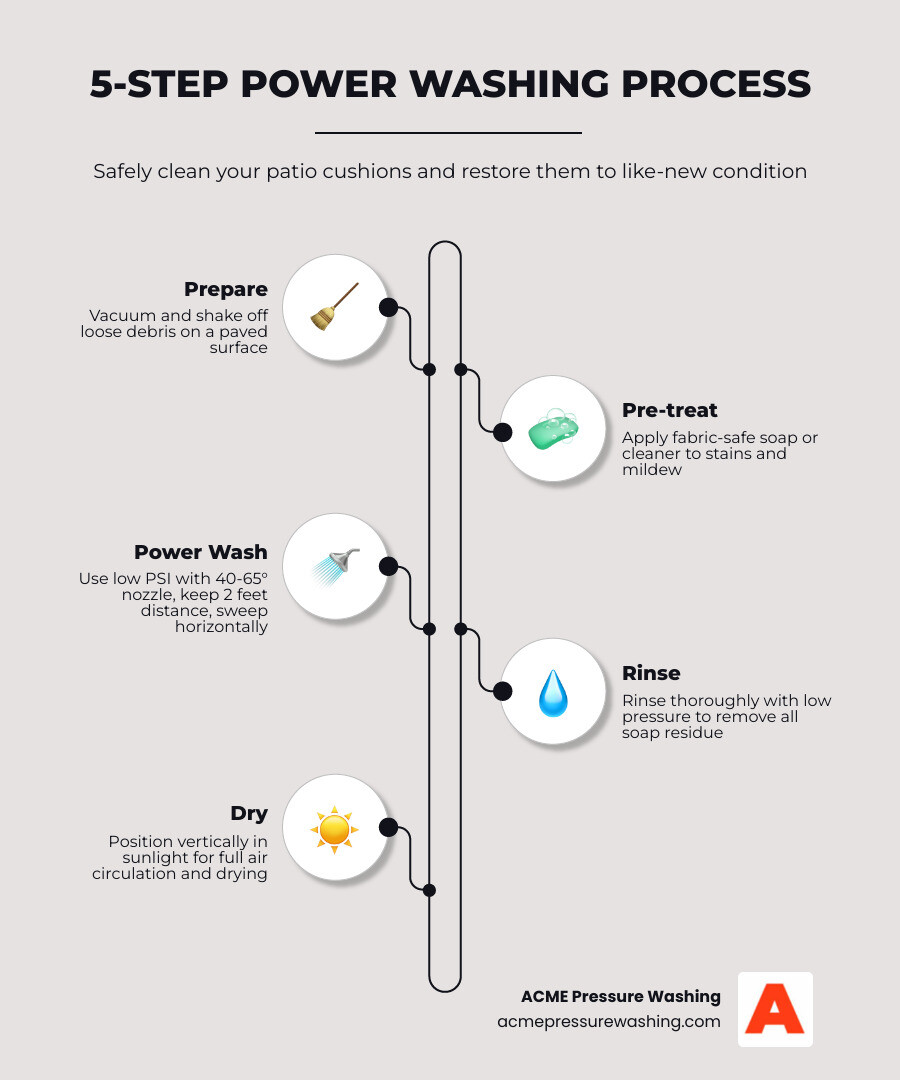
Before you start, check the manufacturer care tags usually located on the seam of the cushion. If the tag says “dry clean only” or warns against high-pressure water, listen to it! For cushions with non-removable covers, power washing is often the most efficient way to get a deep clean that manual scrubbing just can’t match.
According to How to Clean Outdoor Cushions, the best way to maintain material integrity is to ensure the fabric isn’t “dry rotted.” If your cushions have been sitting in the harsh New England sun for five years without protection, the fibers may be brittle. In that case, the high-pressure water might tear the fabric rather than clean it. If your patio itself is looking as dingy as your cushions, you might want to look into Walkway and Patio Cleaning to ensure your entire outdoor space matches your freshly cleaned seating.
Essential Equipment and Pressure Washer Settings
Success in power washing patio cushions is all about the settings. You aren’t trying to strip paint off a barn; you’re trying to gently lift dirt out of a weave.
For most fabric cleaning, we recommend an electric pressure washer. They typically offer lower, more controllable PSI (pounds per square inch) than heavy-duty gas units. You want to stay at the lowest effective pressure—usually under 1,500 PSI for textiles.
The nozzle you choose is just as important as the pressure setting. Never use the “0-degree” (red) tip; that’s essentially a water laser that will slice through your cushions.
| Nozzle Color | Degree | Safety Level for Fabric | Best Use Case |
|---|---|---|---|
| White | 40-degree | Very Safe | General rinsing and light cleaning. |
| Black | 65-degree | Safest | Applying soap and wide-area wetting. |
| Green | 25-degree | Use Caution | Only for very thick, heavy-duty canvas. |
| Red | 0-degree | DANGEROUS | Never use on fabric; will cause permanent damage. |
As noted in How to Pressure Wash Patio Cushions | Apartment Therapy, using a soap reservoir or a dedicated soap tip (usually the black 65-degree nozzle) allows you to apply detergent evenly without the physical strain of hand-scrubbing.
Step-by-Step Guide to Power Washing Patio Cushions
Ready to get started? It’s April 2026, the birds are singing in Bedford and Derry, and it’s the perfect time to reclaim your backyard. Follow these steps to ensure a professional-grade result without the professional-grade headache.
Preparing Your Cushions for Cleaning
Don’t just grab the wand and start blasting. Preparation is the secret to a streak-free finish.
- Clear the Area: Move your furniture to a paved surface like a driveway or a concrete patio. Avoid grass or dirt at all costs—unless you want to create a mud bath for your cushions! Check out our Gallery Walkway and Patio Cleaning for examples of the ideal clean surfaces to work on.
- Dry Debris Removal: Use an upholstery attachment on your vacuum or give the cushions a vigorous shake. This removes loose hair, dust, and pollen before they turn into “mud” when they get wet.
- Secure the Cushions: If you have lightweight cushions, they might fly away once the water hits them. Prop them up against a solid wall or secure them to the furniture frame if the frame is also being cleaned.
The Process of Power Washing Patio Cushions
Now for the satisfying part.
- Pre-Wetting: Start by misting the cushions with plain water. This “opens up” the fabric and prevents the cleaning solution from drying too quickly.
- Soap Application: Use a fabric-safe cleaner. Many homeowners use a mix of dish soap and Borax, or a dedicated outdoor fabric cleaner. Apply the soap using the low-pressure soap tip.
- The 2-Foot Rule: Always keep the nozzle at least 2 feet away from the fabric. As you gain confidence, you can move slightly closer for tough spots, but never closer than 12 inches.
- Overlapping Strokes: Move the wand in horizontal sweeping motions. Each pass should overlap the previous one by about 50% to ensure you don’t leave “tiger stripes” of dirt behind.
Handling Stubborn Stains, Mold, and Mildew
Sometimes, general cleaning isn’t enough. In humid areas like Hollis or Amherst, mold and mildew love to call patio cushions home.
- Mold and Mildew: A solution of 1 cup white vinegar and 1 gallon of water can work wonders. For tougher cases, a peroxide-based cleaner is safer for the environment than bleach.
- Oil and Grease: If a stray burger or some sunscreen hit the fabric, reach for the baking soda. Sprinkle it on, let it sit for 30 minutes to absorb the oil, then vacuum before washing.
- Tree Sap: This is a New Hampshire classic. According to How To Power Wash Patio Cushions – Home & Texture, you can try freezing the sap with an ice cube to make it brittle, then gently scraping it off before power washing.
- Grass Stains: Pre-treat these with a 50/50 mix of warm water and white vinegar. Let it sit for 20 minutes before you start the power washing process.
Post-Cleaning Care: Drying and Maintenance
The job isn’t done when the machine turns off. Improper drying is the number one cause of “returning” mildew.
Ensuring Your Power Washing Patio Cushions Dry Properly
After power washing patio cushions, they will be heavy with water.
- The Squeeze: Gently press down on the cushions with your hands or a clean towel to extract as much moisture as possible. Do not wring them, as this can distort the internal foam.
- Vertical Positioning: Stand the cushions up on their edges, leaning them against a wall or a clean fence. This allows gravity to pull the water down and out.
- Sunlight is Your Friend: The UV rays from the sun are a natural disinfectant that helps kill any remaining bacteria or mold spores. However, don’t leave them out for days on end, as prolonged exposure can eventually lead to fading.
- Air Circulation: Ensure there is plenty of space between each cushion. If you’re in a particularly humid week in Merrimack, a floor fan can help speed up the process. For more tips on maintaining your outdoor structures, see Merrimack Exterior Cleaning from Patios to Fences.
Long-Term Protection and Storage
Once your cushions are bone-dry, it’s time to protect your hard work.
Applying a fabric protectant (like 303 Marine Fabric Guard or similar products recommended by Sunbrella) creates a water-resistant barrier. This makes future spills bead up on the surface rather than soaking in.
When the season ends in late October, don’t just leave them out. Store your cushions in a dry, well-ventilated area—ideally in breathable fabric bags rather than plastic, which can trap moisture and lead to mold. If your patio slabs are also in need of a refresh before the winter sets in, check out How to Deep Clean Patio Slabs Without Breaking a Sweat.
Professional vs. DIY: Costs and Considerations
Is it worth doing yourself? For many homeowners in the Londonderry or Hudson area, the satisfaction of a DIY project is great, but the time commitment can be significant.
DIY involves renting or buying a machine, purchasing specialized cleaners, and spending a full Saturday scrubbing and spraying. If you aren’t careful, a DIY mistake—like using too much pressure—can result in ruined cushions that cost hundreds to replace.
Average Costs for Professional Patio Furniture Cleaning
Based on internet data from April 2026, professional cleaning for a full patio set typically averages $150, though specialized restoration or large commercial sets can range from $75 to over $450 depending on the material and level of staining.
| Factor | DIY Approach | Professional Service |
|---|---|---|
| Time | 4-6 hours | 1 hour |
| Risk | High (Fabric damage) | Low (Insured/Experienced) |
| Equipment | Rental ($40-$100/day) | Included |
| Results | Good to Great | Exceptional/Restorative |
Frequently Asked Questions about Cleaning Outdoor Cushions
How often should you power wash patio cushions?
We recommend a deep clean at least twice a year. Once in the spring to remove any dust or spiders that moved in during storage, and once in the fall before you pack them away. This prevents organic matter like pollen or bird droppings from “setting” into the fabric over the winter.
Can you use baking soda to clean outdoor cushions?
Absolutely! Baking soda is a fantastic, eco-friendly tool. It’s a natural deodorizer and is particularly effective at lifting oil-based stains (like sunscreen or pizza grease). Just make sure to rinse it thoroughly, as dried baking soda can leave a white, powdery residue in the fabric weave.
What is the best location to power wash cushions?
A clean, paved driveway or a concrete patio is the gold standard. You want a surface that allows water to run off quickly without pooling. Never wash cushions on the grass; the pressure from the wand will churn up the soil, splashing mud all over your “clean” cushions.
Conclusion
At ACME Pressure Washing, we know that your outdoor living space is an investment. With over 38 years of experience serving Merrimack, NH, and surrounding areas like Nashua, Manchester, and Windham, we’ve seen it all. We pride ourselves on using safe, customized, and eco-friendly techniques to protect your property while making it look brand new.
Whether you decide to tackle power washing patio cushions yourself or want to leave the heavy lifting to the experts, the goal is the same: a beautiful, clean space to enjoy with your family. If your cushions are clean but your patio is still looking a bit gray, we’re here to help. From residential homes to commercial fleets, we bring the same level of care and expertise to every job.
Ready to see the difference a professional touch can make? Check out our Professional Walkway and Patio Cleaning services today and let us help you get your home ready for the best season yet!
Your Concrete Patio Can Look Brand New — Here’s How
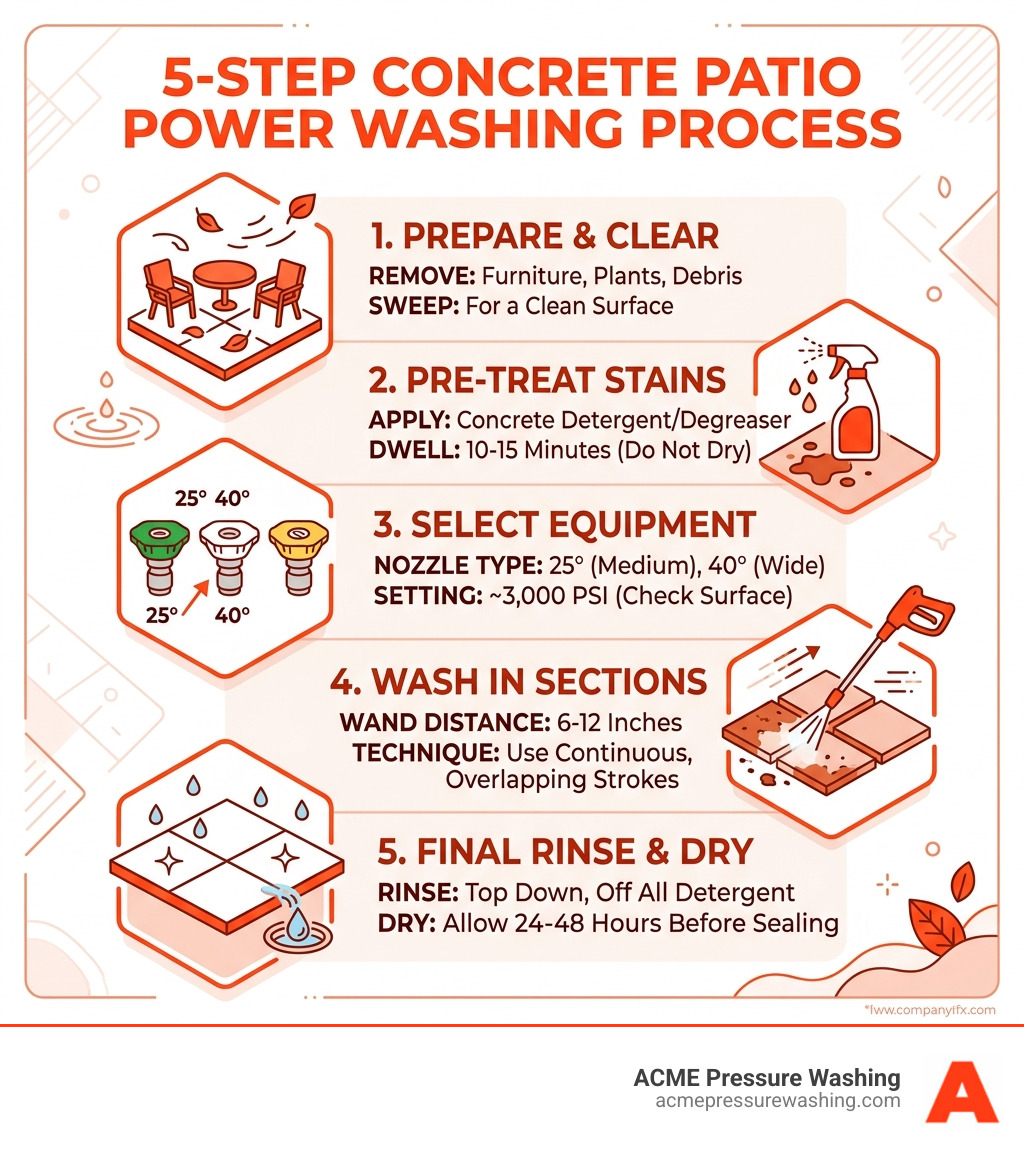
Power wash concrete patio surfaces the right way, and you can strip away years of grime, mold, and stains in just a few hours. Here’s a quick overview of the process:
- Clear the area — remove furniture, plants, and debris
- Pre-treat stains — apply detergent or degreaser and let it dwell 10-15 minutes
- Select the right nozzle — use a 25° or 40° tip at 3,000 PSI
- Wash in sections — hold the wand 6-12 inches from the surface, use overlapping strokes
- Rinse thoroughly — work from the highest point downward
- Seal the concrete — apply sealer after 24-48 hours of drying
Concrete patios look great when they’re new. But concrete is porous, which means dirt, oil, mold, and algae don’t just sit on the surface — they sink in. Regular sweeping and hosing simply can’t reach those embedded stains.
That’s where power washing makes a real difference.
A pressure washer forces water through a narrow nozzle at high speed, creating enough force to pull contaminants out of the concrete’s pores. Done correctly, it can restore a heavily stained patio to near-original condition — without damaging the surface.
This guide walks you through everything: the right equipment, the correct technique, how to handle stubborn stains, and when it makes sense to call in a professional like the team at ACME Pressure Washing instead of going the DIY route.
Why Power Washing is the Best Method for Concrete
If you’ve ever tried to scrub a concrete patio with a garden hose and a push broom, you know how back-breaking and ultimately disappointing that job can be. The reason is simple: concrete is a thirsty, porous material. Think of it like a very hard sponge. Over time, moisture carries dirt, mold spores, and algae deep into the “pores” of the slab.
According to experts at Pure Pressure, power washing is the most effective solution because it uses concentrated mechanical force to “lift” that embedded debris out. While a garden hose might provide 40-60 PSI (pounds per square inch), a professional-grade pressure washer delivers 3,000 PSI or more. This high-velocity water stream doesn’t just wet the dirt; it blasts it loose.
Furthermore, power washing is essential for health and safety. In our humid New Hampshire summers, algae and moss can create a slick film on your patio, turning a beautiful outdoor space into a slip hazard. By using the right Walkway and Patio Cleaning techniques, we can eliminate these organic growths at the root, ensuring your family stays safe on their feet.
Essential Equipment: Choosing the Right Power Wash Concrete Patio Tools
When you decide to power wash concrete patio areas, the machine you choose dictates your results. There are two main numbers to look at: PSI (Pressure) and GPM (Gallons Per Minute). While PSI provides the “punch” to break dirt loose, GPM provides the “flush” to wash it away.
For a standard concrete patio, you want a machine that balances both. Most professionals agree that 3,000 PSI is the “sweet spot” for residential concrete. It’s powerful enough to remove tire marks and deep grime but won’t immediately etch the surface if you’re careful.
Recommended PSI and GPM for Residential Concrete
To clean effectively without spending all day on the job, aim for a pressure washer with at least 3,000 PSI and a flow rate of 4 GPM. Some heavy-duty units go up to 5 or 6 GPM, which significantly speeds up the process for larger areas. If you’re dealing with decorative or stamped concrete, you’ll want to dial the pressure back to about 1,500–2,000 PSI to protect the finish.
Gas vs. Electric Pressure Washers
This is the classic DIY debate. Electric washers are quiet and easy to start, but they often max out around 2,000 PSI and 1.5 GPM. For a small, lightly soiled patio, they might suffice. However, for deep stains or large slabs, a gas-powered unit is almost always the better choice. Gas units provide the consistent high pressure and water volume needed to Deep Clean Patio Slabs Without Breaking a Sweat.
| Feature | Electric Pressure Washer | Gas Pressure Washer |
|---|---|---|
| Average PSI | 1,300 – 2,000 | 2,500 – 4,000+ |
| Average GPM | 1.2 – 1.5 | 2.5 – 5.0+ |
| Best For | Light cleaning, small patios | Deep stains, large driveways |
| Portability | Limited by cord length | High (no cords needed) |
Nozzle Types and Spray Patterns
The nozzle you snap onto the end of your wand determines the “fan” of the water.
- 25-Degree (Green): The workhorse for concrete. It provides a wide enough spray for efficiency but enough force for cleaning.
- 40-Degree (White): Best for rinsing or for more delicate, stamped concrete surfaces.
- Rotary/Turbo Nozzle: This nozzle spins a 0-degree stream in a circle. It’s incredibly effective for tough grime but can be aggressive, so use it with caution.
- 0-Degree (Red): Avoid this on concrete. It’s a pinpoint laser that can easily gouge or “etch” a permanent line into your patio.
Preparation and Safety: Protecting Your Property
Before you pull the trigger, you need to prepare the “battlefield.” High-pressure water is dangerous; it can cut through skin and boots just as easily as it cuts through grime.
Personal Protective Equipment (PPE)
Never wash your patio in flip-flops! Wear sturdy, closed-toe shoes or rubber boots. You also need safety goggles to protect your eyes from flying debris and long pants to shield your legs from “back-splash.”
How to Prepare a Concrete Patio for Power Washing
- Clear the Deck: Remove all furniture, grills, and potted plants. Even small items can become projectiles if hit by the spray.
- Sweep: Use a push broom to remove loose leaves, twigs, and pebbles. This prevents you from just blowing debris around once the water starts.
- Protect the Greens: High-pressure water and detergents can stress your landscaping. Thoroughly soak nearby grass and plants with a garden hose before you start. This dilutes any runoff that reaches them. You can also cover delicate plants with a tarp, but don’t leave it on too long in the sun.
- Identify Drainage: Check where the water will flow. You don’t want a lake forming in your basement or a muddy mess in your flower beds.
For more on site prep, check out this Step-by-step guide for power washing concrete patio.
Step-by-Step Execution and Technique
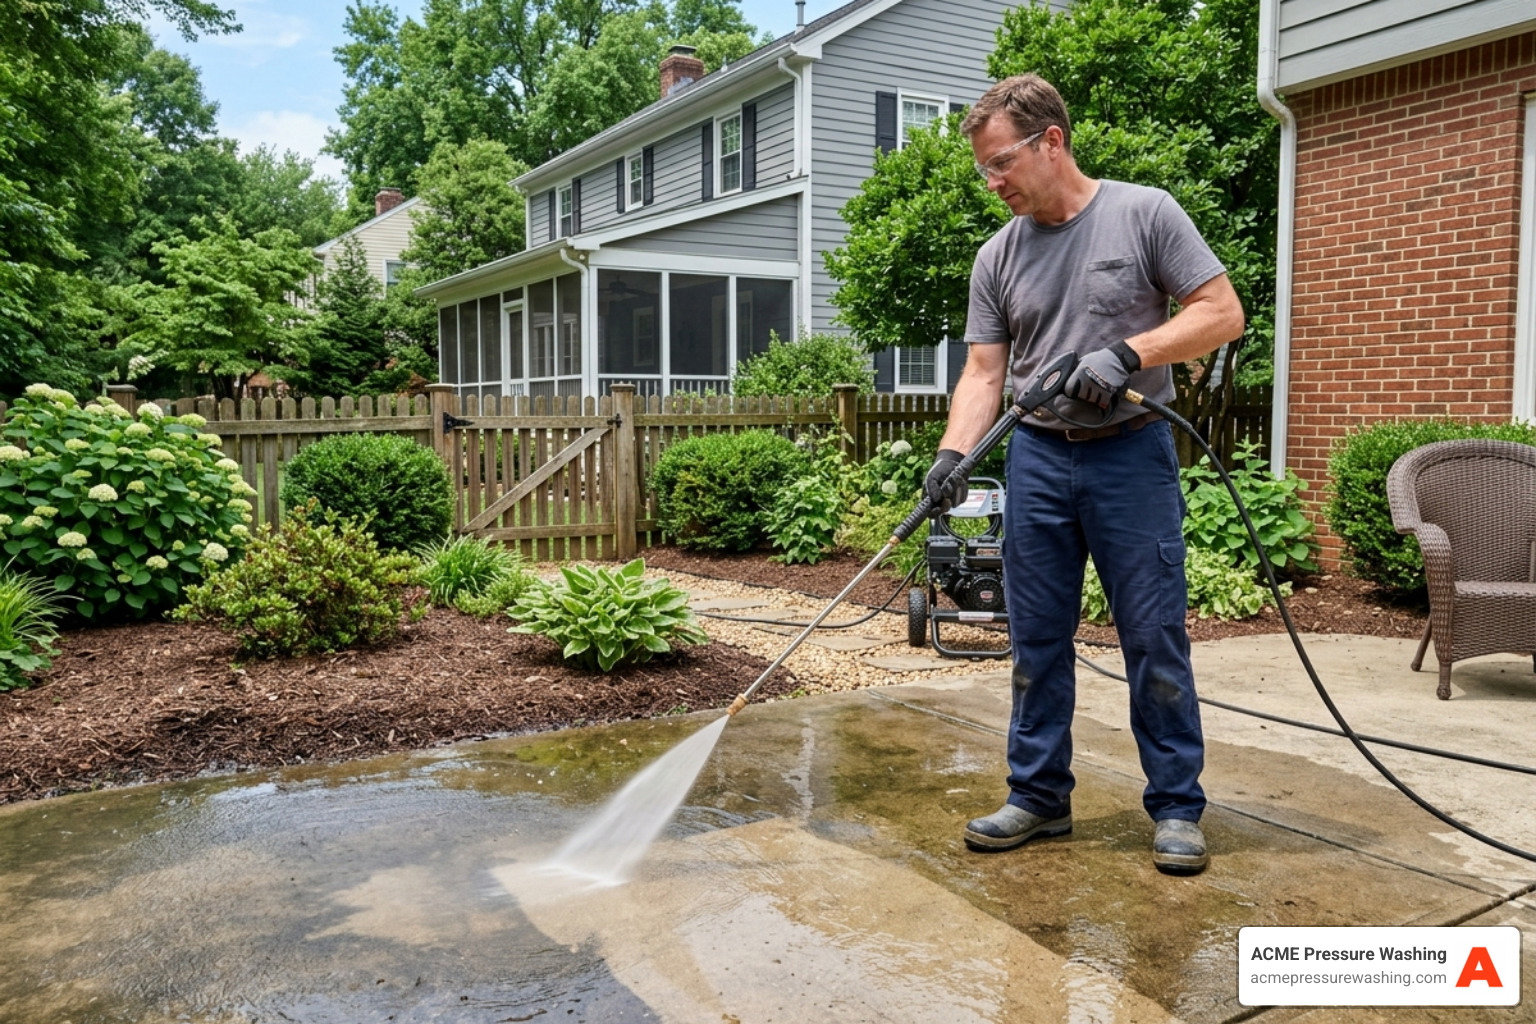
Success when you power wash concrete patio surfaces comes down to technique. If you move too fast, you’ll leave “zebra stripes” (streaks). If you stay in one spot too long, you’ll damage the slab.
The Golden Rules of Technique
- The 45-Degree Angle: Never point the wand straight down at the concrete. Hold it at a 45-degree angle. This allows the water to “peel” the dirt off the surface rather than driving it deeper into the pores.
- The 12-Inch Rule: Keep the nozzle about 12 inches away from the surface. If you need more “bite” for a stain, move slightly closer, but never closer than 6 inches.
- The 50% Overlap: Think of it like mowing the lawn. Each pass should overlap the previous one by about 50%. This ensures you don’t miss any spots and prevents those dreaded streaks.
Step-by-Step Guide to Power Washing a Concrete Patio
- Apply Detergent: Using your low-pressure (soap) nozzle, apply a concrete-safe detergent to the dry patio. Start from the bottom of any slope and work your way up.
- Dwell Time: Let the soap sit for 10–15 minutes. This is “dwell time.” It allows the chemicals to break the molecular bond between the dirt and the concrete. Do not let the soap dry! Mist it with a little water if it starts to evaporate.
- Scrub Tough Spots: For oil or grease, use a stiff-bristled brush to work the detergent into the stain during the dwell time.
- The High-Pressure Wash: Switch to your 25-degree nozzle. Start at the highest point of the patio and work your way down in 3×3 foot sections. Use a steady, sweeping motion.
- The Final Rinse: Once the whole patio is clean, do a final rinse of the entire area (and your siding/plants) to ensure no detergent residue remains.
Handling Tough Stains and Post-Wash Sealing
Sometimes, standard detergent isn’t enough. If your patio has seen 20 years of BBQ grease and oil drips, you might need a specialized approach.
Dealing with Stubborn Contaminants
- Oil and Grease: Use a dedicated alkaline degreaser. For very old stains, an enzyme cleaner can “eat” the oil over several days.
- Rust: Rust often comes from metal patio furniture. A citric-acid-based cleaner can help lift these orange stains without harming the concrete.
- Mold and Algae: A solution of sodium hypochlorite (essentially professional-grade bleach) is the gold standard for killing organic growth.
Common Mistakes When You Power Wash Concrete Patio Surfaces
The most common mistake is using too much pressure or the wrong nozzle. If you see a “powdery” residue or white dust coming off the concrete, you are etching the surface—stop immediately! This removes the “cream” coat of the concrete and exposes the aggregate underneath, which leads to faster deterioration.
Sealing the Concrete After Cleaning
Once your patio is clean, it’s wide open to new stains. We highly recommend sealing the concrete after it has dried for at least 24–48 hours. A high-quality silane/siloxane sealer will penetrate the pores and create a hydrophobic barrier. This makes future cleanings much easier and protects the slab from the harsh New Hampshire freeze-thaw cycles we see in towns like Bedford and Derry.
Professional vs. DIY: Costs and Considerations
While DIY power washing can be a fun Saturday project, it’s a 2–4 hour commitment (at minimum) for a standard patio. You also have to factor in the cost of a rental machine (usually $75–$150 per day) plus the cost of chemicals and fuel.
If you don’t have experience with high-pressure equipment, the risk of “scarring” your concrete is high. Professionals like ACME Pressure Washing have over 38 years of experience and use specialized equipment like surface cleaners. These are circular attachments that hover over the ground, providing a perfectly even clean without the risk of wand streaks.
Average Costs for Patio Cleaning Services
Based on average internet data, professional patio cleaning costs can vary significantly depending on the size and condition of the area.
- Average Range: $150 – $300
- Full Range: $100 – $900 (for very large or heavily stained commercial-grade areas)
Investing in a professional service ensures the job is done safely, eco-friendly detergents are used correctly, and your landscaping is fully protected.
Frequently Asked Questions about Power Washing Concrete
Can power washing damage my concrete patio?
Yes. If you use a 0-degree nozzle or hold a high-pressure wand too close to the surface, you can “etch” or “pit” the concrete. This damage is permanent and can only be fixed by resurfacing the slab. Always start with a wide fan pattern and keep your distance.
How often should I power wash my concrete patio?
In New Hampshire, we recommend a thorough cleaning at least once a year. Spring is the best time to remove the salt and sand from winter. However, if your patio is under heavy tree cover or in a shaded area, a second “refresh” in the fall can prevent mold and algae from taking hold during the damp autumn months.
Do I need a surface cleaner attachment for my patio?
If your patio is larger than a small “landing” pad, a surface cleaner is a lifesaver. It cleans a 15–20 inch path at once, ensuring that the pressure is always at a consistent distance from the ground. This eliminates the “tiger stripes” often caused by uneven wand movements.
Conclusion
A clean patio is the heart of your outdoor living space. Whether you’re hosting a graduation party in Merrimack or a summer BBQ in Amherst, a power wash concrete patio service can make your home feel refreshed and inviting.
At ACME Pressure Washing, we’ve spent the last 38 years perfecting our techniques. We understand the specific challenges that New Hampshire weather poses to concrete, from the humidity that breeds algae to the road salts that cause pitting. We use safe, customized, and eco-friendly techniques to ensure your property is protected while achieving that “like-new” shine.
Ready to reclaim your outdoor space without the DIY headache? We serve homeowners throughout Amherst, Auburn, Bedford, Brookline, Derry, Goffstown, Hollis, Londonderry, Manchester, Merrimack, Milford, Mont Vernon, Nashua, New Boston, Wilton, and Windham.
Schedule Your Professional Patio Cleaning Today and let us do the heavy lifting!
Your Outdoor Furniture Is Dirtier Than It Looks — Here’s What to Do About It
A deck furniture cleaning service is the fastest way to restore grimy, mold-covered patio furniture to like-new condition — without risking damage from the wrong cleaning method.
What does a professional deck furniture cleaning service include?
- Inspection — assessing material type, stain severity, and colorfastness before any cleaning begins
- Pre-treatment — applying eco-friendly solutions to loosen embedded dirt, mold, mildew, and organic buildup
- Soft washing or low-pressure rinse — safely removing grime without damaging fabric, wood, wicker, or metal
- Extraction and drying — removing moisture from cushions and upholstery (typically dries in 6 hours or less)
- Protective treatment — optional fabric protector or UV-resistant coating applied after cleaning to extend furniture life
Who needs it most? Homeowners in New Hampshire — especially in towns like Merrimack, Nashua, and Bedford — where humid summers, heavy pollen seasons, and wet springs create the perfect conditions for mold, algae, and mildew to take hold on outdoor furniture.
The reality is simple: a quick rinse with a garden hose removes surface dirt, but it leaves behind the embedded organic matter that causes buildup to return within days. Professional cleaning removes the problem at the source.
I’m Lionel Greenwood, owner of ACME Pressure Washing, and I’ve been restoring outdoor surfaces across New Hampshire and Southern New England for over 38 years — including hundreds of deck furniture cleaning service jobs in Merrimack, Nashua, Manchester, and beyond. If you want your patio furniture to last longer, look better, and stay cleaner, the sections below walk you through exactly what professional cleaning involves and why it matters in our climate.
Basic deck furniture cleaning service vocab:
- deck pressure washing services
- eco-friendly deck washing service
- pressure washing and staining a deck
What is a Professional Deck Furniture Cleaning Service?
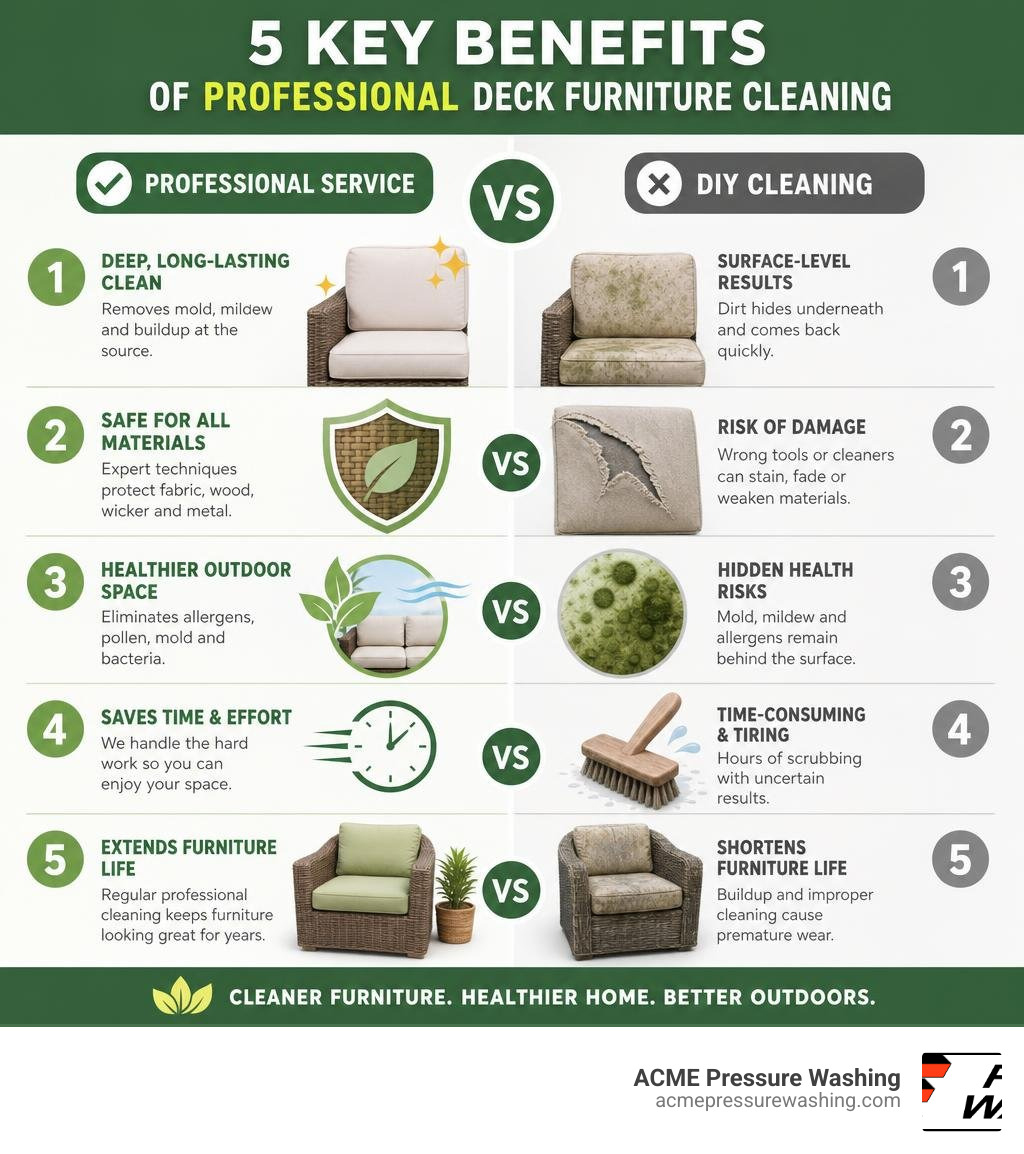
A professional deck furniture cleaning service is a specialized, deep-cleaning solution designed to safely remove environmental grime, mold, mildew, pollen, and stubborn stains from your outdoor furniture. Unlike a quick rinse with a garden hose, which only clears surface-level dust, a professional service targets deep-seated organic matter embedded within porous materials.
This service covers everything from deep cushion sanitization to frame restoration. Professional technicians use commercial-grade, low-pressure soft washing equipment and fabric-safe, biodegradable cleaning solutions. This ensures that delicate fabrics, intricate wicker patterns, and natural wood grains are thoroughly sanitized without being subjected to the destructive forces of high-pressure water.
When you schedule a professional cleaning, you are not just getting your chairs sprayed down. You are receiving a customized restoration treatment that revitalizes the appearance of your entire outdoor living area. Clean, bright furniture makes your deck feel like a true extension of your home. If you want your entire outdoor area to look immaculate, pairing this service with a professional Deck Pressure Washing Bedford NH treatment is the perfect way to prep your Bedford home for summer entertaining.
Materials Handled by a Deck Furniture Cleaning Service
Outdoor furniture comes in a wide variety of materials, and each one requires a highly specific cleaning approach. Using the wrong technique or chemical can ruin delicate fibers, strip protective coatings, or warp natural wood. Professional cleaners are trained to identify and safely treat every common patio material:
- Wood and Teak: Natural wood is highly porous. Over time, it traps moisture, leading to mold, mildew, and wood rot. Teak, while naturally oil-rich and durable, can turn a dull gray and develop dark tannin stains from falling leaves. Professional cleaning gently lifts embedded dirt from the wood grain, preparing it for sealing or staining.
- Wicker and Rattan: The tight, intricate weaves of wicker furniture are notorious for trapping dust, pollen, and spiderwebs. Hand-scrubbing these tight crevices is nearly impossible. Soft washing safely flushes out these hard-to-reach pockets of dirt without unraveling the delicate fibers.
- Metal (Aluminum and Wrought Iron): Metal furniture is prone to oxidation, rust, and hard water spots. Professional cleaners use specialty formulations to break down mineral deposits and restore the original shine to painted or powder-coated metal frames.
- Resin and Plastic: While low-maintenance, lighter-colored plastic and resin furniture quickly show dark streaks, pollen stains, and mold. Eco-friendly detergents lift these stains, making white and beige plastics look bright and inviting again.
- Outdoor Fabrics and Cushions: Sunbrella and other outdoor fabrics are engineered to resist moisture, but they still collect dust, body oils, and mold over time. Specialized extraction cleaning sanitizes these deep cushion layers without saturating the inner foam permanently.

Whether you have natural wood loungers or delicate upholstered cushions, professional care ensures your investment is protected. For homeowners seeking comprehensive upholstery care, you can also look into specialized Expert Air Duct, Carpet, Rug & Upholstery Cleaning in Auburn, NH to keep both your indoor and outdoor fabrics in top shape throughout Auburn.
The Step-by-Step Deck Furniture Cleaning Service Process
To achieve deep, long-lasting results, professional cleaners follow a structured, multi-step process:
- Pre-Service Inspection: The process begins with a detailed assessment. Technicians inspect the furniture frames, identify the fabric types, and perform a dye-bleed test on cushions to ensure colorfastness.
- Dry Soil Removal: Before applying any water or cleaning solutions, the furniture and cushions are thoroughly vacuumed or brushed to remove loose dust, pollen, pet hair, and surface debris.
- Eco-Friendly Pre-Treatment: A customized, biodegradable cleaning solution is applied. This solution is specifically formulated for the frame and fabric material. It sits for 10 to 20 minutes to break down grease, mold spores, and organic stains at their roots.
- Soft Washing & Low-Pressure Rinse: Using specialized soft washing equipment, technicians gently rinse away the loosened grime. Unlike traditional power washing, which can tear fabrics and splinter wood, soft washing operates at a safe, low pressure (typically between 500 and 800 PSI).
- Extraction & Grooming: For cushions and upholstered pieces, commercial extraction tools pull out excess moisture, dirt, and cleaning agents. The fabric fibers are then groomed to promote fast, even drying.
- Protective Post-Treatments: Once clean, an optional fabric protector or UV-resistant treatment can be applied. This helps repel future liquid spills, prevents deep staining, and guards against sun-induced fading.
- Final Quality Check: A thorough walk-through is conducted to ensure every piece meets professional standards. Cushions are often propped up in an inverted “V” shape to maximize airflow and ensure they dry completely in 6 hours or less.
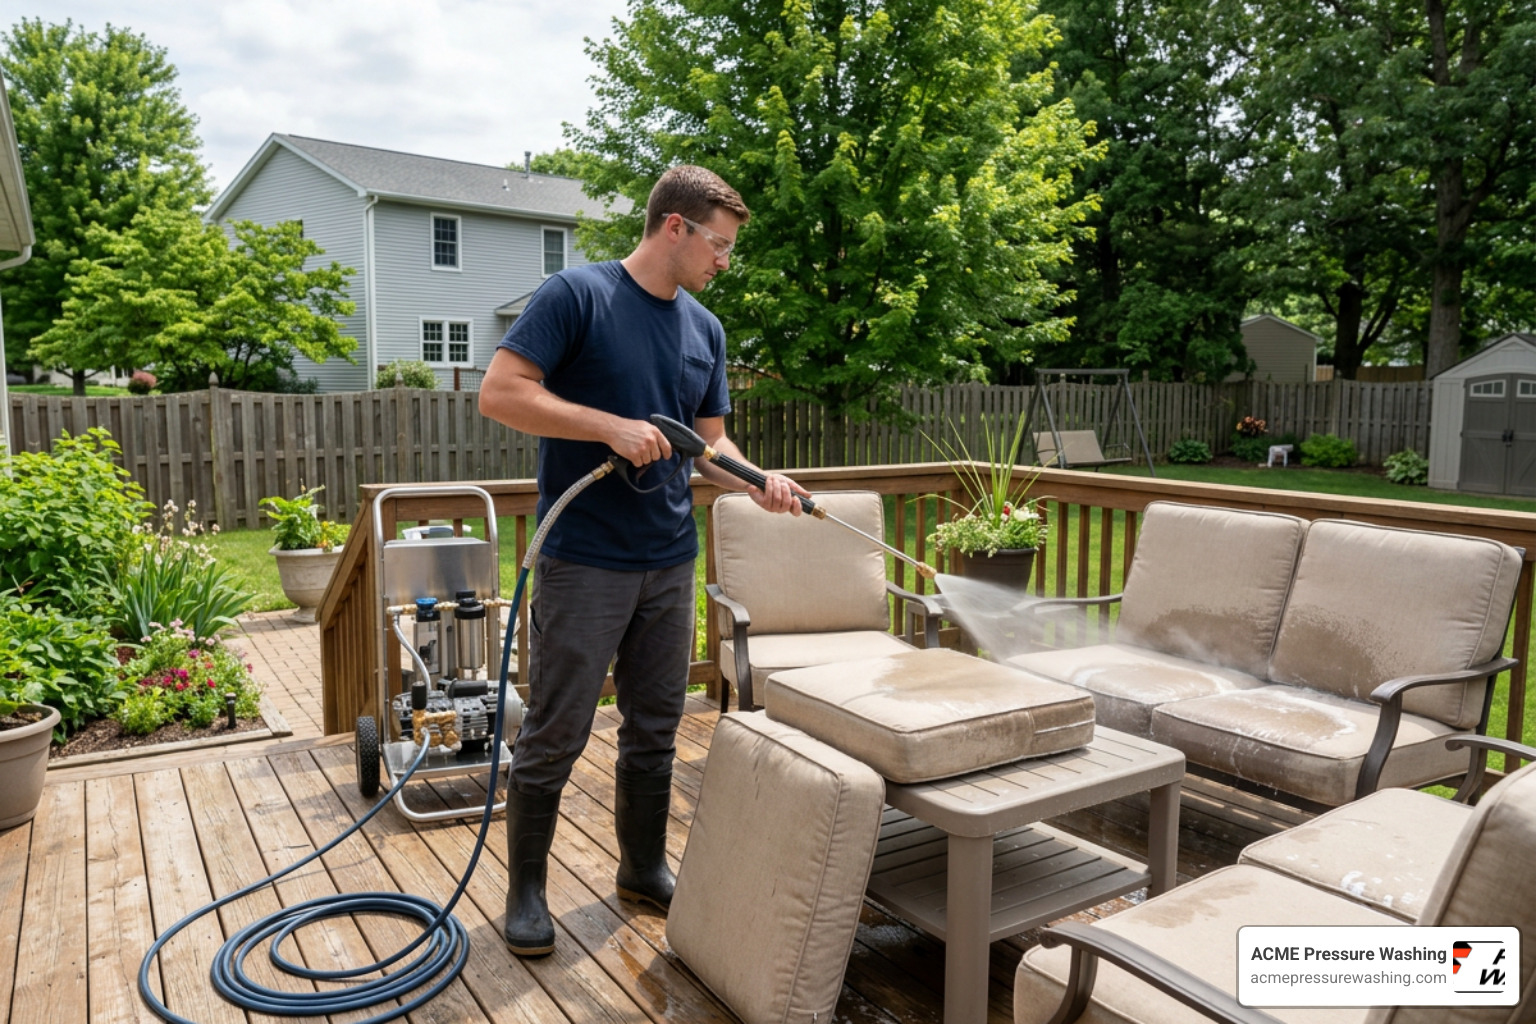
This rigorous process is highly effective at restoring tired-looking patios. If your deck itself is looking weathered, combining your furniture cleaning with a professional Deck Pressure Washing Manchester NH service will leave your entire Manchester outdoor space looking brand new.
Why New Hampshire Weather Demands Professional Care
Our New England climate is incredibly beautiful, but it is exceptionally tough on outdoor surfaces. Homeowners in Southern New Hampshire experience a wide range of seasonal weather patterns that actively contribute to the rapid degradation of patio furniture.
First, our harsh, freezing winters followed by humid summers create a destructive cycle. When furniture is left outdoors or stored in unheated sheds, moisture seeps into porous wood grains and fabric cushions. During winter, this moisture freezes and expands, causing wood fibers to splinter and structural joints to weaken.
In the spring, heavy tree pollen coats everything in a sticky, yellow layer. This pollen acts as a food source for mold and mildew. As summer humidity levels rise, these microscopic spores multiply rapidly, turning beautiful cushions and wood frames into breeding grounds for dark, unsightly mold.
Additionally, shaded yards and lakeside properties in areas like Londonderry are highly susceptible to green algae growth. Algae thrives in damp, shaded spots, leaving a slick, green film on wood, composite, and concrete surfaces. This is more than just an aesthetic issue; slippery, algae-coated outdoor surfaces are a major liability. According to regional safety data, falls on slippery algae-coated outdoor surfaces account for thousands of emergency room visits annually in Oregon and similar damp climates, highlighting why keeping these spaces clean is a matter of safety.
To protect your home’s exterior surfaces from these elements, professional maintenance is key. Homeowners often coordinate their seasonal furniture cleaning with other vital exterior maintenance, such as Professional roof cleaning in Londonderry or a comprehensive Deck Pressure Washing Londonderry NH service, to completely clear away winter grime and prepare for the sunny months ahead.
Extending Lifespan and Protecting Your Investment
High-quality outdoor furniture is a significant financial investment. A premium teak dining set, a hand-woven wicker sectional, or designer Sunbrella cushions can cost thousands of dollars. Leaving these items to weather the elements without regular deep cleaning is a recipe for early replacement.
Routine professional cleaning removes the embedded organic matter—such as mold, mildew, and tree sap—that slowly eats away at wood finishes and degrades synthetic fabric fibers. For natural wood furniture, keeping the surface free of mold prevents the wood rot and decay that eventually leads to structural failure. For fabrics, removing abrasive dirt particles prevents them from cutting into the weave when people sit down, which causes premature tearing and thinning.
To see the difference between taking a proactive approach versus neglecting your outdoor setup, consider the comparison below:
| Feature | Professional Cleaning Service | DIY / Neglect |
|---|---|---|
| Cleaning Method | Customized soft washing & eco-friendly solutions | High-pressure blasting or basic hose rinse |
| Mold & Algae Removal | 100% eradication at the root level | Surface-level removal; quick regrowth |
| Fabric Protection | Deep extraction & optional UV/stain protectors | No protection; fabric weakens and fades |
| Wood Protection | Preserves natural oils; prepares wood for sealing | Splintered wood fibers; high risk of rot |
| Average Lifespan | 10 to 15+ years of beautiful utility | 3 to 5 years before structural/fabric failure |
Taking care of your furniture goes hand-in-hand with taking care of your deck. To learn more about how to preserve your outdoor wooden structures, check out our Merrimack Homeowners Guide to Sustainable Deck Restoration and Care to keep your entire Merrimack outdoor living space in pristine, sustainable condition.
Frequently Asked Questions About Patio Furniture Cleaning
How often should outdoor furniture be professionally cleaned?
To maintain fabric integrity and prevent the buildup of destructive mold and mildew, professional outdoor furniture cleaning is recommended every 6 months.
Ideally, you should schedule your first cleaning in the late spring (late April or May) to wash away winter dust, storage grime, and early pollen. A second cleaning in the late autumn, right before you pack your furniture away or shrink-wrap it for the winter, ensures that mold spores and leaf tannins do not sit on your furniture frames and cushions for months in cold storage. Regular maintenance is especially important for homes in Bedford with heavily shaded yards, where organic growth accumulates much faster.
What are the average costs for professional outdoor furniture cleaning?
When looking at the cost of a professional deck furniture cleaning service, it is important to note that all prices mentioned here are average costs sourced from publicly available internet data and are not the actual prices of ACME Pressure Washing.
According to general online industry data, the average cost for basic patio furniture cleaning is around $150. However, actual pricing varies widely based on the size of your set, the material type, and the level of staining. To account for this industry variability, average professional packages typically range from $300 on the lower end for a standard table and chair set, up to $750 or more for larger, multi-piece sectional setups with heavy cushion deep-cleaning and protective treatments. If you are preparing your Manchester home for the season, requesting a customized quote is the best way to get an accurate estimate for your specific setup.
Is the cleaning process safe for my landscaping and pets?
Yes, when performed by experienced professionals. At ACME Pressure Washing, we prioritize safety by using eco-friendly, biodegradable, and plant-safe cleaning solutions.
Our customized soft washing process relies on gentle, low-pressure applications paired with specialized detergents that break down organic matter without releasing harsh chemicals into your yard. Additionally, our team pre-wets and post-rinses surrounding grass, flower beds, and shrubs in Merrimack to ensure your beautiful landscaping remains completely protected and unharmed throughout the service.
Conclusion
Your deck is the heart of your outdoor relaxation, and your patio furniture should be a clean, comfortable, and inviting place to unwind. Don’t waste your weekends scrubbing stubborn mold stains, risking damage to your expensive fabrics, or splintering your wood frames with improper pressure washing techniques.
With over 38 years of experience, ACME Pressure Washing provides safe, customized, and eco-friendly cleaning techniques designed to restore your outdoor oasis. We proudly serve homeowners across Southern New Hampshire, including Merrimack, Nashua, Bedford, Manchester, and surrounding towns.
Beyond patio furniture, our highly trained teams specialize in a full suite of exterior cleaning services, including house washing, commercial pressure washing, and fleet pressure washing.
Let us do the heavy lifting so you can sit back, relax, and enjoy a beautiful, healthy outdoor space.
Ready to transform your deck?
- Call us today at +1603-883-6900 to speak with our friendly team.
- Click here to fill out our quick Online Contact & Quote Form.
- Schedule a professional deck restoration service to complete your outdoor transformation!
Moss on Patio Pavers Is a Safety Hazard — Here’s What to Do
If you want to kill moss on patio pavers, here are the most effective methods:
- White vinegar solution — Mix equal parts white vinegar and water, spray onto moss, wait 10–30 minutes, scrub with a stiff brush, and rinse.
- Baking soda — Sprinkle dry baking soda directly on moss, leave for 2–3 days, then brush away.
- Boiling water — Pour directly onto moss for immediate results; repeat as needed.
- Bleach solution — Mix 1 part bleach with 3–10 parts water, apply, wait 15 minutes, scrub, and rinse thoroughly.
- Professional power washing — Best for heavy infestations or large areas; prevents joint damage and spore spread.
That slippery green film creeping across your patio isn’t just ugly — learning how to kill moss on patio pavers is a genuine safety issue. Moss becomes extremely slippery when wet, turning a backyard patio or walkway into a serious fall hazard, especially after a New England rain.
It starts small. A thin green line between stones. Then, before long, entire sections look carpeted. In damp, shaded conditions — which are very common across Merrimack, Nashua, and the surrounding New Hampshire region — moss spreads fast and digs in deep.
The good news? You don’t always need heavy equipment or harsh chemicals to deal with it. Several household remedies work well on moderate growth. The bad news? DIY methods have real limits, and the wrong approach (like aggressive pressure washing) can damage your paver joints and make the problem worse.
I’m Lionel Greenwood, owner of ACME Pressure Washing, and I’ve been removing moss, algae, and grime from patios and walkways across New Hampshire for over 38 years — I know exactly what it takes to kill moss on patio pavers safely without causing structural damage. In the sections below, I’ll walk you through what actually works, what to avoid, and when it makes sense to call in a professional.
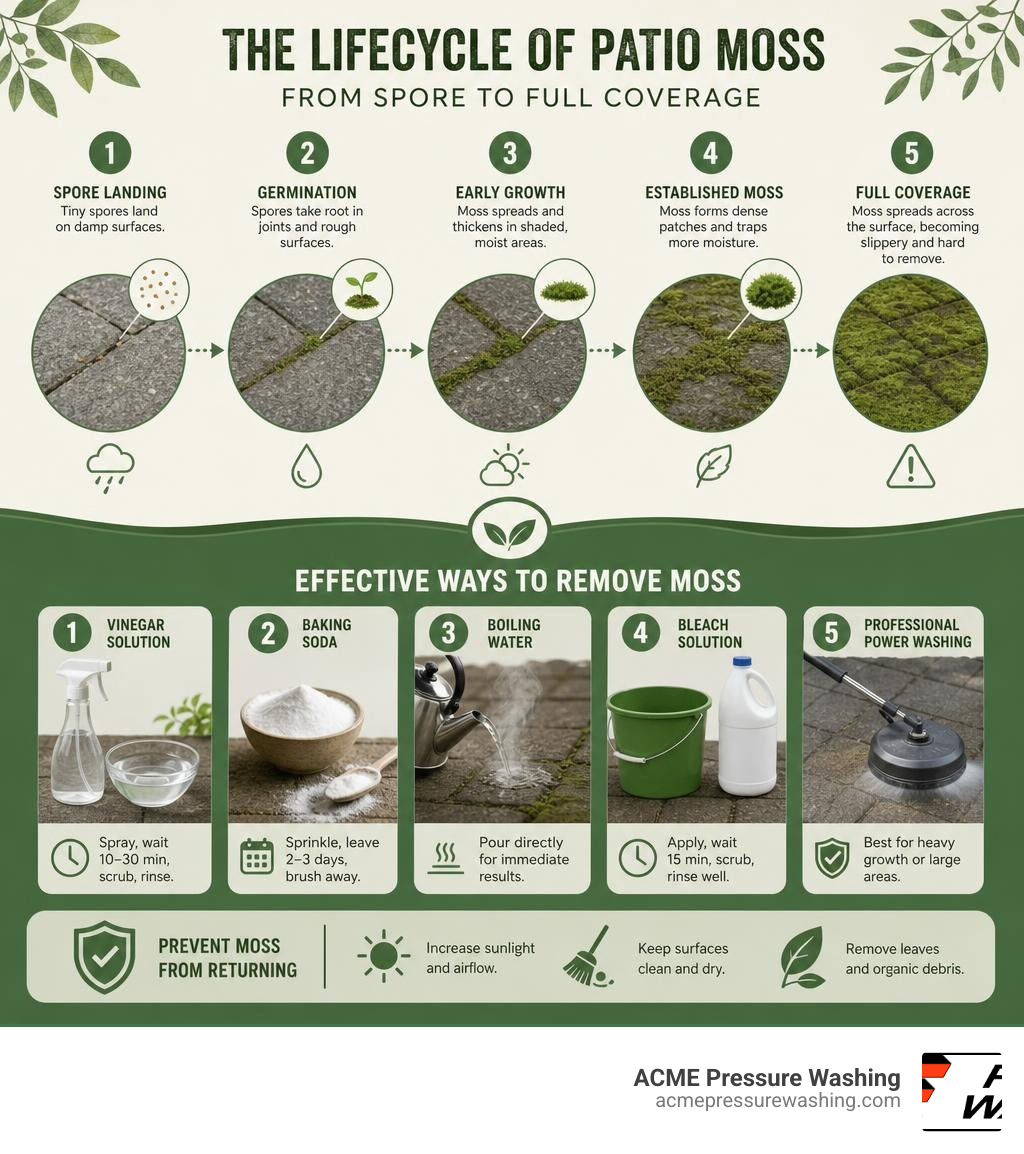
Simple guide to kill moss on patio pavers:
Why Moss Invades New Hampshire Patios and Walkways
To effectively kill moss on patio pavers, we first need to understand why it chooses your hardscape as its favorite home. Moss is a primitive, non-vascular plant. Unlike grass or garden flowers, it doesn’t have true roots. Instead, it anchors itself using tiny hair-like structures called rhizomes. Because it doesn’t need deep soil to thrive, the narrow, sand-filled joints between your patio pavers are prime real estate.
In southern New Hampshire communities like Merrimack, Bedford, Nashua, and Amherst, several local environmental factors come together to create the perfect storm for moss growth:
- Deep Shade: Moss lacks the vascular system to survive intense, direct sunlight. Patios built under mature tree canopies, behind two-story homes, or beneath second-story decks receive very little sun, keeping the surface cool and shaded.
- Persistent Dampness & Clay Soil: Many yards in Bedford and Amherst have dense, clay-heavy soils that naturally retain water. When rainwater cannot drain away quickly, it pools around the edges of the patio, keeping the pavers damp for days.
- Freeze-Thaw Cycles: Our harsh New Hampshire winters create micro-cracks in concrete pavers and brick. When spring arrives, these tiny, weathered crevices collect moisture and organic debris, giving microscopic moss spores a secure place to take root.
- Acidic Environments: Concrete pavers and clay bricks are naturally porous and can develop a slightly acidic surface pH over time. Moss thrives in acidic conditions, making untreated hardscapes highly vulnerable.
Left unchecked, moss does more than create a slippery safety hazard. It traps moisture against the surface of the stone, accelerating the breakdown of the paver material. During winter, this trapped water freezes and expands, causing the pavers to crack, spall, and shift out of alignment.
High-Level Natural Methods to Kill Moss on Patio Pavers
If you catch a moss infestation early, you don’t necessarily have to jump straight to industrial-strength chemicals. There are several highly effective, low-impact household remedies that can disrupt the plant’s cellular structure and make it easy to remove.

When we look at natural methods, we are essentially trying to shock the plant. Because moss draws moisture and nutrients directly through its leaves rather than deep roots, it is highly sensitive to sudden changes in temperature, acidity, and alkalinity.
To see how these household solutions stack up in real-world testing, you can read about a direct comparison in this article on how I Tried Three Ways to Remove Moss From My Pavers — One Worked Surprisingly Fast. For those interested in a deeper dive into kitchen-cupboard alternatives, you can also explore Baking Soda To Kill Moss On Pavers (11 Proven Methods).
Let’s break down the two most popular DIY natural remedies: white vinegar and baking soda.
Using White Vinegar to Kill Moss on Patio Pavers
Household white vinegar is highly effective against moss due to its acetic acid content. The acid breaks down the protective outer layer of the moss, causing it to dehydrate and die within hours.
To use this method safely and effectively, follow these steps:
- Prepare the Mixture: Mix a 1:1 solution of white vinegar and water in a garden sprayer. For severe patches, some homeowners use a stronger 65/35 vinegar-to-water ratio.
- Apply Strategically: Choose a dry, sunny day. Spray the mixture directly onto the green moss, ensuring it is thoroughly saturated.
- Dwell Time: Let the solution sit for 10 to 30 minutes. You will notice the vibrant green moss begin to turn a dull, brownish-yellow color.
- Scrub and Rinse: Use a stiff-bristled scrub brush to dislodge the dead moss from the paver surface and joints. Rinse the area thoroughly with a garden hose.
Crucial Safety Precaution: Acetic acid is non-selective. This means it will kill your prized garden beds, lawn, and surrounding ornamental plants just as easily as it kills the moss. Always use a targeted spray nozzle, protect nearby vegetation with plastic sheeting, and avoid spraying on windy days to prevent drift. For more guidance on using natural acids safely, check out our guide on How to Kill and Prevent Patio Moss for Good.
Applying Baking Soda to Kill Moss on Patio Pavers
If you prefer to avoid acidic treatments, baking soda (sodium bicarbonate) is an excellent alkaline alternative. While vinegar burns the moss with acid, baking soda dramatically raises the pH of the paver surface, creating an ultra-alkaline environment that moss simply cannot tolerate.
Here is how to apply it:
- The Dry Sprinkle Method: On a dry day when no rain is forecast for at least 48 hours, sprinkle dry baking soda generously over the damp moss.
- Mist Lightly: Use a spray bottle to lightly mist the powder with water. This activates the sodium bicarbonate without washing it away.
- Wait It Out: Let the baking soda sit for 2 to 3 days. The moss will gradually dry out, turn black, and die.
- Sweep and Clean: Once the moss is completely dead and dry, sweep it away with a stiff broom.
Because baking soda is non-acidic, it is exceptionally gentle on concrete and brick pavers, eliminating any risk of etching or surface discoloration. To learn more about preparing your patio for this type of seasonal cleaning, read our article on how to Clean Your Patio Pavers Like a Pro This Weekend.
The Risks of DIY Moss Removal and Joint Sand Damage
While the idea of tackling patio moss with a weekend DIY project is appealing, it comes with significant structural risks. The most common mistake homeowners make is renting a high-powered pressure washer from a local home improvement store and blasting the patio at maximum pressure.

This aggressive approach often leads to a major structural issue known as interlocking friction failure.
Paver patios do not rely on mortar to stay in place. Instead, they are held together by a tight network of joint sand (often polymeric sand) that creates friction between the stones. This sand locks the pavers into a solid, unified surface that can support heavy weight and resist shifting.
When you blast a pressure washer directly into the joints to remove moss, you inevitably wash away this vital joint sand. Without sand, the pavers lose their structural integrity. Over the next few months, water will seep underneath the stones, washing away the gravel bedding and causing the patio to sag, wobble, and shift out of alignment.
Furthermore, high-pressure washing without proper sanitization actually spreads microscopic moss spores across your entire yard, leading to an even larger infestation the following spring. To understand how to handle paving stones without ruining their foundation, read our professional insights on Pressure Washing Paving Stones Like a Pro.
If you do choose to manually scrape the joints, you must use specialized tools like a block paving knife or a wire-bristled joint brush. For a detailed look at manual, non-chemical weed and moss extraction, refer to Remove Moss from Patio Joints: Home Remedies That Work.
Long-Term Prevention: Keeping Your Pavers Moss-Free
Once you successfully kill moss on patio pavers, the real work begins: keeping it from coming back. Moss removal is only a temporary fix if you do not address the underlying environmental conditions that allowed it to grow in the first place.
To protect your investment and maintain a safe, slip-free patio, implement these long-term preventative measures:
- Improve Drainage: If water pools on your patio, consider digging shallow, gravel-filled French trenches along the edges of the hardscape to direct runoff away from the foundation. Ensure your gutters are clean and downspouts are directed away from the pavers.
- Increase Sunlight and Airflow: Prune back low-hanging tree branches and dense shrubs that cast continuous shade over your patio. Increasing sunlight and wind exposure will help the pavers dry out rapidly after a rainstorm.
- Apply a Professional Sealant: This is the single most effective way to prevent moss. A high-quality, breathable paver sealant fills the microscopic pores in the concrete or brick, preventing water from soaking into the stone and cutting off the moisture supply that moss needs to survive. Learn more about this process in our guide on How to Clean and Seal Your Patio for Long-Lasting Beauty.
Comparing DIY vs. Professional Care
To help you decide between tackling this project yourself or hiring a professional team, here is a direct comparison of the two approaches:
| Feature | DIY Manual Scrubbing & Household Remedies | Professional Hot-Water Power Washing & Sealing |
|---|---|---|
| Effort Required | High (hours of physical scrubbing, scraping, and rinsing) | None (fully completed by trained technicians) |
| Risk of Damage | High (risk of joint sand erosion, paver shifting, and stone etching) | Extremely Low (customized, low-pressure soft washing techniques) |
| Effectiveness | Temporary (kills surface moss, but leaves deep spores intact) | Long-lasting (hot water kills spores at the root; sealant blocks future growth) |
| Equipment Used | Standard garden hose, push broom, household spray bottle | Industrial hot-water pressure washers, surface cleaners, professional sealants |
| Average Cost | $20 – $50 (cost of vinegar, baking soda, and brushes) | See pricing details below* |
*Pricing Note: Based on publicly available internet data, the average cost for professional patio cleaning and sealing across the industry is approximately $450. However, due to variations in patio size, level of moss infestation, and site accessibility, national industry rates range widely from a low end of $900 to a high end of $2,500 for extensive restoration and sealing projects. Please note that these figures represent general online market data and do not reflect the actual pricing structures of ACME Pressure Washing.
Frequently Asked Questions about Patio Moss Removal
How long does it take for vinegar to kill moss on pavers?
When you apply a 1:1 white vinegar and water solution on a warm, dry day, the drying process begins almost immediately. You will typically see the moss start to turn yellow and brown within 24 hours. Within 2 to 3 days, the cellular structure of the moss will completely collapse, making it dry, brittle, and ready to be swept away with a stiff brush. If the infestation is particularly thick or if the weather is cool and damp, a second application may be required.
Will pressure washing damage my paver joints?
Yes, if done incorrectly. Using a standard high-PSI pressure washer with a narrow spray nozzle pointed directly down into the joints will quickly blast away the polymeric sand holding your pavers together. This leads to uneven settling and shifting.
To avoid this, professionals use specialized rotary surface cleaners that distribute water pressure evenly across the surface, combined with customized, low-pressure “soft washing” techniques and hot water to sanitize the stone without disturbing the joint sand.
What is the best time of year to treat patio moss in New Hampshire?
The absolute best times of year to treat patio moss in New Hampshire are early spring (April to May) and late autumn (September to October). During these transitional seasons, temperatures typically hover in the optimal 50–80°F range, which is ideal for cleaning solutions to work effectively without evaporating too quickly.
As of June 2026, we are in the prime summer maintenance season. If you are treating moss during the hot summer months, always apply your treatments in the cooler early morning hours (between 8:00 AM and 11:00 AM) to prevent the sun from drying out your vinegar or baking soda mixtures before they can fully penetrate the plant.
Conclusion
While natural household remedies like white vinegar and baking soda can help you manage small, localized patches of moss, keeping a large paver patio safe, beautiful, and structurally sound requires a professional touch.
At ACME Pressure Washing, we bring over 38 years of exterior cleaning experience directly to your doorstep. Operating out of Merrimack, NH, we proudly serve homeowners and businesses throughout Bedford, Nashua, Amherst, and the surrounding communities. Our USP is simple: we combine decades of local expertise with safe, customized, eco-friendly hot-water cleaning techniques that eliminate moss and spores without damaging your pavers, washing away your joint sand, or harming your surrounding landscape.
Don’t let slippery green slime ruin your outdoor living space or put your family at risk of a dangerous fall. Let our experienced team restore your patio to its original beauty and protect it for years to come.
- To restore your walkways and outdoor living spaces, check out our walkway and patio cleaning services.
- Ready to get started? Get a free quote today or call us directly at +1603-883-6900.
- We also specialize in a full suite of exterior cleaning services. Learn about our house pressure washing, explore commercial pressure washing for your business, or discover fleet and equipment pressure washing to keep your commercial assets in top condition.
Why Your Patio Pavers Deserve More Than a Quick Rinse
Patio pavers cleaning is one of the most effective ways to restore your outdoor living space and protect a significant property investment — and it doesn’t have to take all weekend.
Here’s how to clean patio pavers effectively:
- Clear the area — remove furniture, planters, and loose debris
- Pull weeds from between joints
- Rinse the surface with a garden hose to pre-wet pavers
- Apply a cleaning solution suited to your paver material and stain type
- Scrub with a stiff-bristle brush or use a pressure washer at 1,200–1,800 PSI
- Rinse thoroughly until water runs clear
- Re-sand the joints with polymeric or kiln-dried sand
- Seal the surface (every 3–5 years) for lasting protection
New Hampshire winters are tough on outdoor surfaces. In towns like Merrimack and Bedford, freeze-thaw cycles, road salt, and seasonal humidity quietly break down even well-installed paver patios — loosening joint sand, encouraging mold and algae growth, and letting stains sink deeper into porous surfaces year after year. Most homeowners don’t notice the damage until it’s already costly to fix.
The good news? Regular cleaning and a little seasonal attention can keep your patio looking sharp and add years to its life.
I’m Lionel Greenwood, owner of ACME Pressure Washing, and I’ve spent more than 38 years restoring outdoor surfaces — including patio pavers cleaning jobs across New Hampshire for both residential and commercial clients. In this guide, I’ll walk you through exactly what works, what to avoid, and when it makes sense to call in a pro.
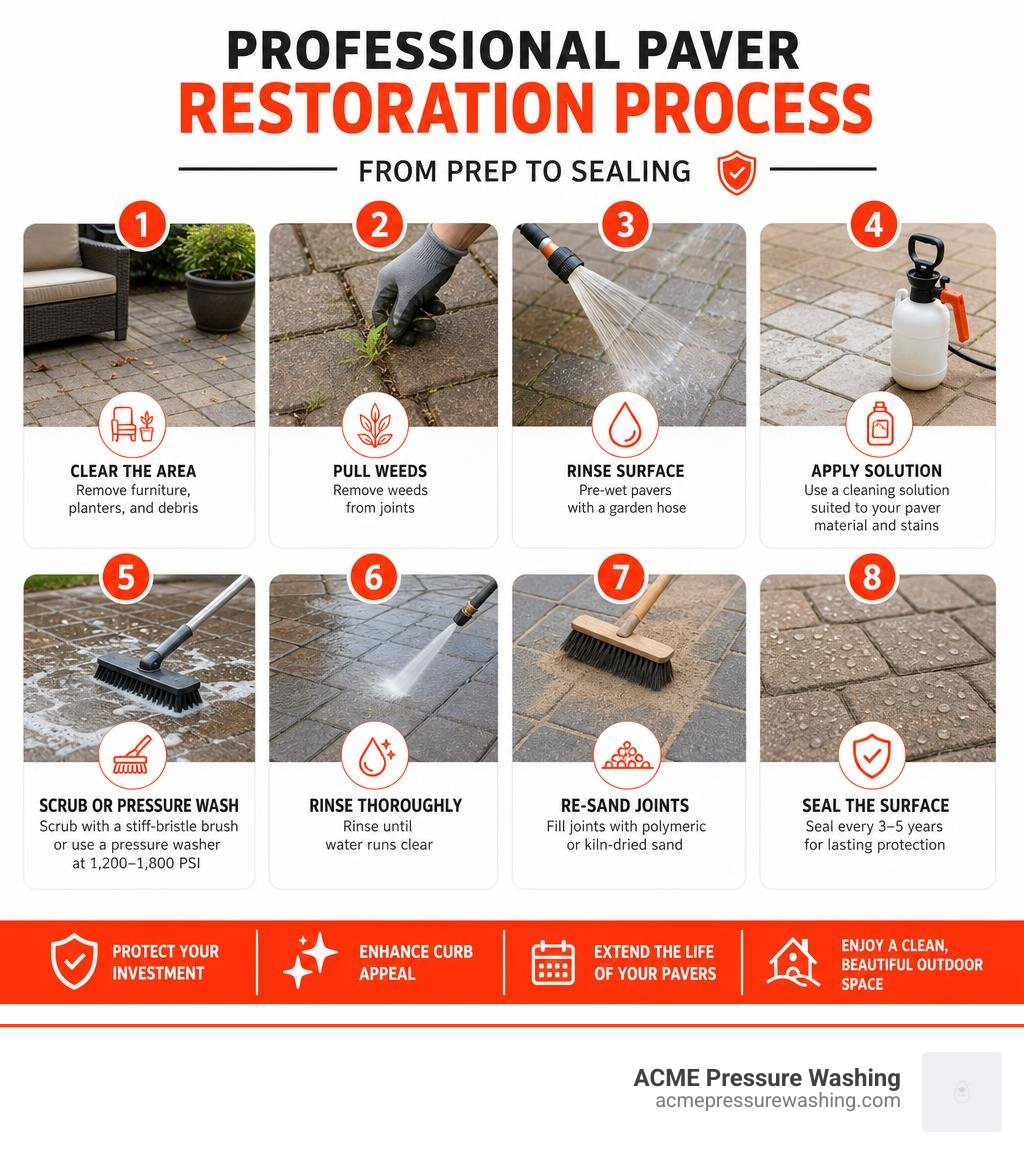
Easy patio pavers cleaning glossary:
The Science of Patio Pavers Cleaning and Material Care
Before you grab a scrub brush or fire up any equipment, you must understand what your patio is made of. Pavers are not created equal, and using the wrong cleaning chemical or too much physical force can permanently ruin their finish.
Concrete Pavers
Concrete pavers are incredibly popular across New Hampshire, from backyards in Auburn to commercial courtyards in Bedford. They are highly durable but inherently porous. This means they act like a hard sponge, absorbing water, motor oil, and organic tannins from falling autumn leaves. For concrete, we recommend using a mild, pH-balanced detergent or specialized concrete cleaners. You can learn more about preserving these surfaces in our guide on How to Clean and Seal Your Patio for Long-Lasting Beauty.
Natural Stone Pavers
Whether you have granite, slate, travertine, or limestone on your property in Manchester, natural stone requires the gentlest touch. Natural stone is highly sensitive to acidic cleaners. Using acidic solutions like vinegar or harsh commercial rust removers can etch the stone, dulling its natural color and permanently pitting the surface. Always stick to pH-neutral stone cleaners and soft-bristled brushes. For premium stone installations, check out the resources provided by Your Premier Supplier of Concrete Pavers in Auburn New Hampshire to ensure you are matching your cleaning technique to your specific stone profile.
Porcelain Pavers
Porcelain is the newcomer to many modern outdoor designs. Unlike concrete or natural stone, premium porcelain pavers are practically non-porous. They resist stains beautifully and do not absorb moisture, making them highly resistant to freeze-thaw damage. However, they can still collect a surface layer of slick algae, mold, and dirt. Cleaning porcelain is relatively simple: a mild dish soap solution and a soft nylon brush are usually all it takes to restore their shine. Avoid wire brushes at all costs, as they can scratch the beautiful factory finish. For more material-specific tips, you can read the official guidelines on How to Clean Pavers | Unilock.
High-Level Steps for Restoring Your Outdoor Surfaces
Restoring your patio is a systematic process. If you skip a step, you risk locking in dirt, washing away structural joint sand, or encouraging rapid weed regrowth.
Step 1: Surface Preparation and Debris Removal
Begin by removing all patio furniture, grills, and planters. Next, use a leaf blower or a stiff outdoor broom to sweep away loose leaves, twigs, and dirt. If you skip this, wetting the patio will turn that dry dust into a stubborn layer of mud.
Step 2: Weed and Moss Eradication
Weeds and moss love the damp, shaded joints between pavers. Use a manual weeding tool or a joint scraper to pull weeds out by their roots. For moss, which can spread rapidly in our humid New Hampshire summers, we recommend applying a targeted treatment. You can read our professional recommendations on How to Kill and Prevent Patio Moss for Good to ensure the roots are completely dead before you begin washing.
Manual Patio Pavers Cleaning Without a Pressure Washer
If you do not own a pressure washer, or if you want to avoid the risks of using high-pressure water on delicate stone, manual cleaning is a highly effective, safe alternative. It takes more physical effort, but it gives you total control over the process.
To clean your pavers by hand, follow this high-level process:
- Saturate the Surface: Thoroughly wet the entire patio with a garden hose. Keeping the pavers wet prevents the cleaning solution from drying out too quickly, which can leave unsightly white soap films.
- Mix Your Solution: In a large bucket, mix warm water with a mild, biodegradable dish soap or a specialized paver cleaner. For organic stains or mildew, a mild oxygen-bleach solution can also be used.
- Scrub with a Push Broom: Dip a stiff-bristle push broom (avoid wire bristles) into the soapy water and scrub the pavers in circular motions. Work in small, manageable sections so the soap does not dry on the surface.
- Rinse and Dry: Thoroughly rinse the dirty suds off the patio with your garden hose, directing the runoff away from your landscaping.
For a deeper look at manual techniques, read the step-by-step guide on How to Clean Patio Pavers Without a Pressure Washer | Family Handyman or check out our article on How to Deep Clean Your Patio Using Elbow Grease Instead of Electricity.
Advanced Patio Pavers Cleaning with Professional Equipment
While manual scrubbing works well for minor seasonal dirt, heavy algae growth, deep oil stains, and large commercial spaces require professional-grade equipment. However, using a pressure washer on pavers is a double-edged sword.
If you use too much pressure or hold the spray wand too close to the surface, you can easily etch concrete, scar natural stone, and blast out all of the joint sand holding your patio together.
If you choose to use a pressure washer, keep these professional rules in mind:
- Keep PSI Low: Never exceed 1,200 to 1,800 PSI when cleaning pavers. High-pressure commercial concrete settings (3,000+ PSI) will destroy the surface of your pavers.
- Use a Wide Fan Tip: Use a 25-degree or 40-degree nozzle tip. Never use a pinpoint “0-degree” red nozzle, which acts like a physical chisel.
- Maintain Distance and Angle: Keep the wand at least 12 inches away from the surface and spray at a shallow 30-degree angle. Never spray straight down into the joints, as this will instantly wash out the joint sand.
- Use a Surface Cleaner Attachment: For even, streak-free results, professionals use rotating surface cleaners. This distributes the pressure evenly and prevents the “tiger striping” marks common with DIY wand washing.
For more detailed safety settings, read our guide on Pressure Washing Paving Stones Like a Pro and explore The Ultimate Guide to Finding the Perfect PSI for Concrete Driveways to understand how pressure settings change based on the substrate.
Managing Tough Stains, Efflorescence, and Joint Sand
Simple dirt is easy to wash away, but specific stains require targeted chemical treatments. Because concrete and stone are porous, stains quickly bind to the material at a molecular level.
Oil and Grease Stains
Whether it is food grease from a summer barbecue in Goffstown or motor oil on a driveway in Auburn, oil must be lifted, not just scrubbed. Sprinkle kitty litter, cornstarch, or baking soda directly onto fresh oil spills to absorb the excess liquid. Once dry, sweep it up and apply a specialized alkaline degreaser or liquid dish soap. Let it sit for 15 minutes to break down the oil, then scrub gently and rinse.
Rust Stains
Rust often occurs when metal patio furniture, toys, or fertilizers containing iron come into contact with damp pavers. Because rust is an iron oxide, it requires an acid-based cleaner to dissolve. However, as we mentioned earlier, acids can damage natural stone and concrete. Always use a specialized, non-acidic rust remover designed specifically for pavers, and spot-test it in an inconspicuous area first.
Efflorescence
Have you noticed a chalky, white powder appearing on the surface of your concrete pavers? This is called efflorescence. It is a natural process where water-soluble salts inside the concrete migrate to the surface as moisture evaporates. While it often wears away naturally over time, severe cases can be treated with specialized efflorescence removers.
To make things easier, we have put together this quick-reference table for treating common paver issues:
| Stain / Issue | Primary Cause | Recommended Treatment | Avoid This! |
|---|---|---|---|
| Oil & Grease | Grills, vehicles, food spills | Alkaline degreaser, baking soda, dish soap | High-pressure blasting (pushes oil deeper) |
| Rust | Metal furniture, iron fertilizers | Specialized non-acidic rust remover | Muriatic acid, wire brushes |
| Efflorescence | Natural salt migration | Specialized efflorescence wash, gentle scrubbing | Sealing over the white powder |
| Mold & Algae | Shaded areas, high humidity | Diluted bleach (10:1) or specialized organic cleaner | Acidic vinegar on natural stone |
The Critical Role of Joint Sand
Once your pavers are completely clean and dry, you must inspect the joints. Water and cleaning will inevitably wash away some of the sand between the pavers. This sand is not just decorative; it provides the friction needed to keep the pavers from shifting, cracking, and rubbing against one another.
Always sweep fresh kiln-dried sand or polymeric sand back into the joints after a deep clean. If you are using polymeric sand, sweep away all excess sand from the surface of the pavers using a broom or leaf blower before misting it with water to activate the hardening polymers. For more tips on managing deep-cleaning projects, read How to Deep Clean Patio Slabs Without Breaking a Sweat.
The Impact of New Hampshire’s Climate on Paver Longevity
Our local climate in New Hampshire presents unique challenges for hardscape maintenance. In towns like Bedford, Goffstown, Merrimack, and Auburn, pavers are subjected to extreme weather swings.
During our harsh winters, water seeps into unsealed, porous pavers. When this water freezes, it expands, creating internal pressures of up to 25,000 PSI. Over time, this constant expansion and contraction causes concrete to crack, spall, and shift, leading to uneven walkways and tripping hazards.
Furthermore, winter de-icing salts and coastal air accelerate the chemical breakdown of concrete. In the spring and summer, high humidity and heavy tree cover create the perfect breeding ground for slippery green algae and black mold, which ruin your curb appeal and create dangerous slip-and-fall hazards.
To combat these climate challenges, we highly recommend sealing your pavers every 3 to 5 years. A high-quality, breathable sealer acts as a protective shield, preventing water from penetrating the pores, locking in the joint sand, protecting against UV fading, and making future patio pavers cleaning much easier. You can explore our professional approach to protecting these surfaces on our Walkway and Patio Cleaning service page.
Frequently Asked Questions About Paver Maintenance
How much does professional patio paver cleaning and sealing cost in New Hampshire?
Based on average online industry data, homeowners can expect to pay anywhere from $1.00 to $2.00 per square foot for basic cleaning, sand replacement, and sealing. However, due to the wide variability in paver conditions, access, and regional labor costs, actual project prices can range widely.
For instance, a highly complex, heavily stained, or neglected residential patio requiring extensive weed removal and restorative sealing can range from $3.00 to $10.00+ per square foot depending on the level of restoration required. These figures are based on general internet averages and do not represent the exact pricing of ACME Pressure Washing. To see real-world examples of restored hardscapes in Bedford, Goffstown, and Merrimack, view our Gallery Walkway and Patio Cleaning.
Can you use household bleach or vinegar to clean pavers?
While household bleach can be highly effective at killing stubborn mold and algae when diluted properly (typically 1 part bleach to 10 parts water), it must be used with extreme caution. Bleach can runoff and kill surrounding grass and prized landscaping.
Vinegar, while eco-friendly, is highly acidic (pH of around 2 to 3). It should never be used on natural stone like travertine, limestone, or marble, as it will chemically etch and ruin the surface. For alternative household options, check out our guide on Does Washing Powder Clean Block Paving The Ultimate Guide.
How often should pavers be sealed?
In our New Hampshire climate, we recommend sealing your pavers every 3 to 5 years. If your patio is in a highly shaded, wooded area prone to dampness, or if it experiences heavy commercial foot traffic, it may require maintenance cleaning annually and sealing closer to the 3-year mark.
For sunny, open patios, you can easily go 5 years between sealer applications. Sealing not only locks in joint sand but also prevents UV rays from fading the rich colors of your stone. To learn more about the best cleaning methods, read our guide on Top Rated Cleaners to Make Your Patio Shine Again.
Conclusion
A beautiful paver patio, walkway, or pool deck is a wonderful addition to any New Hampshire home or business, but keeping it pristine requires consistent care. While simple sweeping and light rinsing can be handled over a weekend, deep restorative cleaning, polymeric sand replacement, and professional-grade sealing are tasks best left to experienced professionals.
At ACME Pressure Washing, we bring over 38 years of industry experience using safe, customized, eco-friendly pressure washing and soft-washing techniques. We proudly serve residential and commercial clients throughout Merrimack, Goffstown, Auburn, Bedford, and the surrounding areas.
Whether you need to restore your home’s curb appeal, clean up a commercial storefront, or maintain your business’s assets, we are here to help. In addition to hardscape restoration, we specialize in high-quality House Pressure Washing, large-scale Commercial Pressure Washing, and Fleet and Equipment Pressure Washing services.
Stop spending your weekends scrubbing heavy stains or risking damage to your expensive stone installations with rental pressure washers. Let our experienced team handle the hard work safely and efficiently.
Ready to bring your outdoor surfaces back to life?
- Get a free estimate: Fill out our quick online Contact ACME Pressure Washing quote form.
- Explore our services: Visit our Walkway and Patio Cleaning Services page to see how we can protect your investment today!
Your Patio Is Worth Protecting — Here’s What You Need to Know
Patio clean and seal is the single most effective way to restore your outdoor surface and keep it looking great for years to come.
Quick answer — the basic process:
- Clear and sweep the patio surface
- Pre-treat stains (oil, rust, algae, efflorescence) with targeted cleaners
- Pressure wash at 1,900–2,700 PSI for a deep clean
- Allow 24–48 hours to dry completely
- Re-sand joints with polymeric sand if you have pavers
- Apply sealer in 2 coats, let cure fully before use
- Repeat every 2–3 years to maintain protection
Here’s the reality most homeowners in Merrimack, NH face: patios take a beating. Freeze-thaw cycles, pollen, mold, leaf stains, and foot traffic all add up. Over time, even a well-built patio starts to look worn, faded, and stained.
The good news? You don’t need to tear it out and start over.
A proper clean and seal restores color, blocks future stains, and prevents the kind of slow surface damage — crumbling edges, weed-filled joints, slippery algae — that shortens a patio’s life. Done right, it’s one of the highest-return maintenance tasks you can do for your outdoor space.
This guide walks you through the full process: what to clean with, how to pressure wash safely, which sealer to choose, and when to call in a professional.
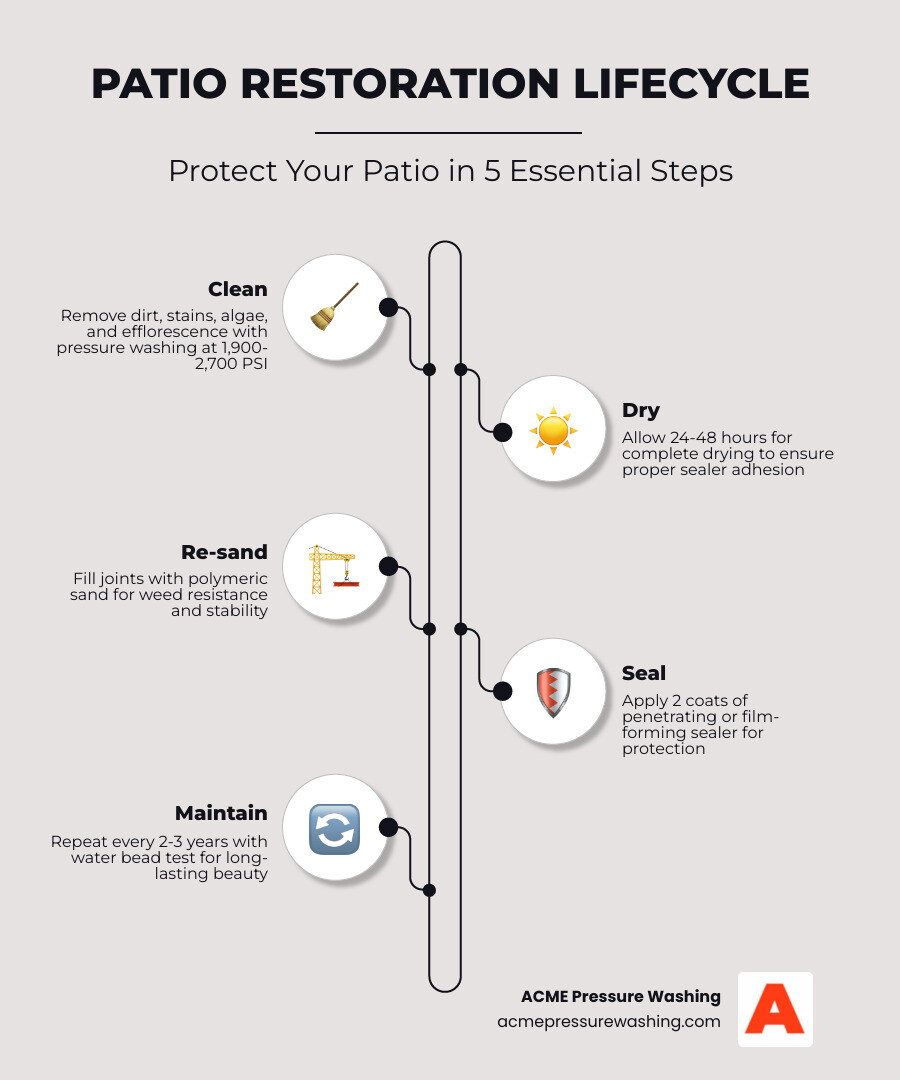
The Essential Guide to a Professional Patio Clean and Seal
When we talk about a patio clean and seal, we aren’t just talking about a quick rinse with a garden hose. A professional-grade restoration is a structural necessity that protects your investment. Whether you have concrete pavers, brick, travertine, or stamped concrete, the porous nature of these materials means they act like a giant sponge for New Hampshire’s elements.
Without a sealer, water penetrates the surface. In towns like Amherst and Bedford, where winter temperatures fluctuate wildly, that trapped water freezes and expands, leading to cracks, spalling, and crumbling. Furthermore, organic matter like pollen and fallen leaves creates stubborn tannin stains that can become permanent if not addressed. According to Patio Sealing and Cleaning 101 | Haynes Materials, sealing should ideally be done within one year of installation and then maintained on a regular cycle to prevent this degradation.
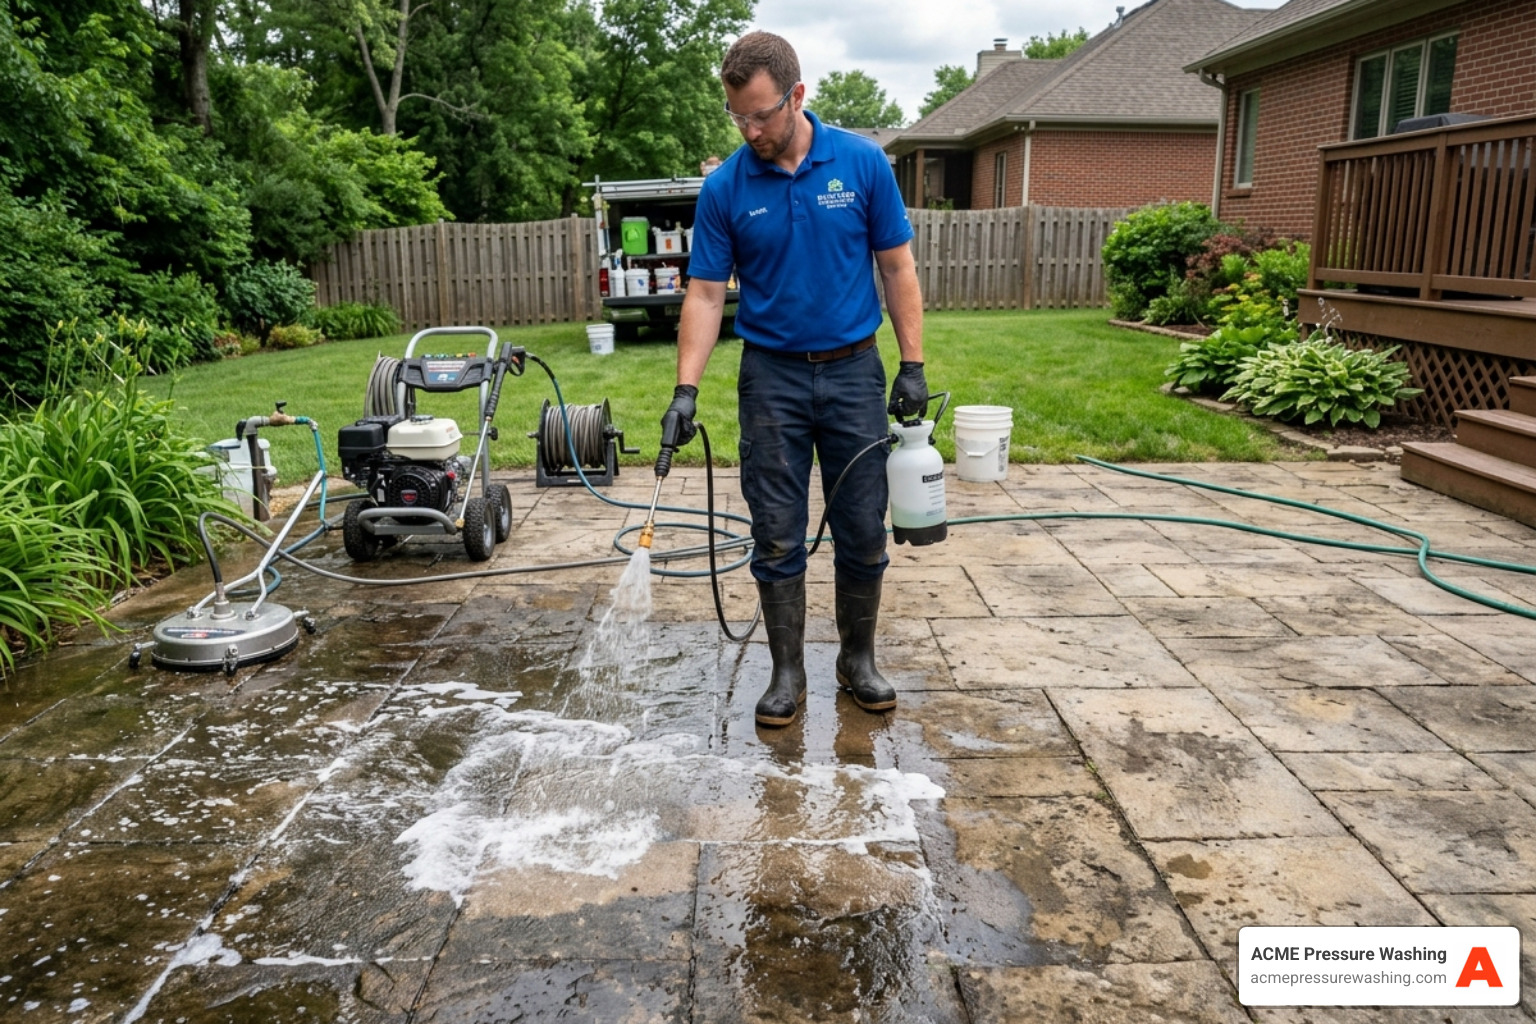
Why Surface Preparation is Critical
You might be tempted to jump straight to the “fun” part—spraying on that shiny sealer. Don’t do it! Sealing a dirty patio is like painting over a mud puddle; you’re just trapping the mess forever.
Proper preparation is the foundation of Restoring Walkways and Patios. We focus on three main enemies during prep:
- Efflorescence: That white, powdery salt that migrates to the surface of pavers. If you seal over it, you’ll trap a permanent white haze under the coating.
- Biological Growth: Mold, mildew, and algae love our humid New England summers. If not killed at the root, they will continue to grow under the sealer, causing it to delaminate and peel.
- Contaminants: Oil from grills, rust from patio furniture, and old joint sand prevent the sealer from bonding to the actual stone or concrete.
Choosing the Right Patio Clean and Seal Products
Not all cleaners are created equal. Using the wrong chemical can etch your stone or kill your expensive landscaping. We recommend a “targeted” approach:
- Alkaline Cleaners: Great for general dirt and grime.
- Acid-Based Cleaners: Necessary for removing efflorescence and stubborn mineral deposits (must be used with extreme caution on certain stones).
- Degreasers: Essential for those “oops” moments near the BBQ grill.
- Algaecides: These don’t just wash away green slime; they kill the spores to prevent regrowth.
At ACME Pressure Washing, we prioritize eco-friendly, biodegradable options that are safe for your family and pets in Merrimack and the surrounding areas.
Step-by-Step Cleaning and Restoration Process
A successful patio clean and seal follows a strict order of operations. We start by clearing the deck—literally. All furniture, pots, and grills must be moved. Then, we perform a deep sweep to remove loose debris.
The real magic happens during the Walkway and Patio Cleaning phase. We apply the appropriate detergents and allow them to “dwell.” This dwell time lets the chemicals break the molecular bond between the stain and the patio surface.
Pressure Washing Techniques and Safety
This is where many DIY projects go south. A pressure washer is a powerful tool, not a toy. For most patios, you want to stay within the 1,900 to 2,700 PSI range.
- The Danger of High Pressure: Cranking a machine up to 4,000 PSI can “etch” concrete, leaving permanent swirl marks or blowing the “cream” finish right off the top of your pavers.
- The Fan-Tip Nozzle: Never use a “0-degree” red tip; it acts like a laser and will scar the stone. Use a 25-degree or 40-degree fan tip for even distribution.
- Surface Cleaners: We use professional-grade circular surface cleaners. These tools have rotating bars that provide a consistent, streak-free clean that you simply can’t achieve with a wand alone.
Re-sanding Joints for Stability
If you have a paver patio, the cleaning process will inevitably wash out some of the sand in the joints. This is actually a good thing! It allows us to replace old, dirty sand with fresh polymeric sand.
Polymeric sand contains special additives that, when activated with water (a process called hydro-compaction), harden like mortar but remain flexible. This provides:
- Weed Resistance: It’s much harder for seeds to take root in hardened sand.
- Insect Prevention: Say goodbye to those annoying ant hills between your bricks.
- Structural Integrity: It “locks” the pavers together, preventing them from shifting or sinking over time.
Selecting and Applying the Perfect Sealer
Choosing a sealer is the most subjective part of the process. Do you want your patio to look like a shiny showroom floor, or do you prefer the raw, natural look of the stone?
| Feature | Film-Forming Sealer | Penetrating Sealer |
|---|---|---|
| Appearance | Glossy / “Wet Look” | Matte / Natural |
| Protection | Surface Barrier | Internal Pore Clogging |
| Breathability | Moderate | High |
| Longevity | 2-3 Years | 5-10 Years |
| Best For | Stamped Concrete, Dark Pavers | Natural Stone, Travertine |
Check out our Gallery Walkway and Patio Cleaning to see the visual difference between these finishes.
Film-Forming vs. Penetrating Sealers
- Film-Forming (Acrylics): These sit on top of the surface. They are fantastic for “popping” the color of faded pavers and giving that rich, deep look. However, they can be slippery if a non-slip additive isn’t used, and they require more frequent reapplication.
- Penetrating (Silane-Siloxane): These soak into the pores and work from the inside out. They don’t change the look of the patio at all, but they make the surface hydrophobic—meaning water beads up and rolls off. These are excellent for New Hampshire’s freeze-thaw cycles because they allow the stone to “breathe” moisture out from the ground.
Application and Curing Times
Timing is everything. You need a “weather window” of at least 48 hours of dry weather. If it rains shortly after application, the sealer can turn a milky white color—a nightmare to fix.
We typically use a high-volume, low-pressure pump sprayer for even coverage, followed by a “back-roll” with a nap roller to ensure the sealer is pushed into every nook and cranny. According to Patio Maintenance Tips, you should allow the first coat to dry for 4 to 6 hours before applying a second, and then stay off the patio entirely for 24 to 48 hours. A full cure can take up to 10 days, so hold off on dragging that heavy cast-iron fire pit back into place!
Long-Term Maintenance and Protection
Once your patio clean and seal is complete, you want that beauty to last. Sealing provides a sacrificial layer that takes the brunt of UV damage and chemical attacks.
Protecting Against Weather and Wear
In our region, the biggest threat is the winter. De-icing salts are incredibly corrosive to concrete. A high-quality sealer acts as a shield, preventing those salts from eating into the surface. In the summer, the sealer blocks UV rays that cause the pigments in your pavers to fade. Think of it as high-SPF sunscreen for your backyard.
When to Schedule Your Next Patio Clean and Seal
How do you know when it’s time to do it all again? We recommend a 2 to 3-year cycle for film-forming sealers and a bit longer for penetrating ones.
The “Bead Test”: Pour a cup of water onto your patio. If it beads up like a waxed car, you’re protected. If the water soaks in and turns the stone dark, your sealer has worn away, and it’s time to give us a call. Seasonal timing is also key; early spring (after the pollen drop) or early fall (before the leaves fall) are the best times for a refresh in New Hampshire.
DIY vs. Professional Services: Costs and Benefits
Many homeowners wonder if they should tackle this as a weekend project. While DIY is possible, the results often vary wildly.
Based on internet data, the average cost for professional patio cleaning and sealing ranges from $0.75 to $6.50 per square foot. For a standard 400-square-foot patio, you might see quotes ranging from $300 on the low end to over $2,600 for premium restoration and high-end coatings.
Benefits of Professional Restoration
While you can rent a pressure washer for $100, there are significant advantages to hiring a pro:
- Commercial Equipment: Our machines use hot water and high-flow rates that residential units can’t match.
- Specialized Detergents: We have access to professional-grade algaecides and efflorescence removers not found at big-box stores.
- Liability Insurance: If a DIYer etches their stone or kills their lawn, they’re on the hook. We are fully insured and certified.
- Time Savings: What takes a homeowner two or three weekends, we can often complete in two days of active work.
Frequently Asked Questions about Patio Care
How long should a patio dry before sealing?
Patios need to be bone-dry. We recommend 24 to 48 hours of dry weather after cleaning before applying sealer. Trapping moisture under a sealer is the #1 cause of “blushing” (white, hazy patches).
Can I seal over old sealer?
It depends. If the old sealer is the same base (water-based vs. solvent-based) and is still in good condition, you can often “refresh” it. However, if the old sealer is peeling or turning white, it must be chemically stripped before a new coat can be applied.
Will sealing make my patio slippery?
Film-forming sealers can be slick when wet. To solve this, we always recommend adding a slip-resistant additive (a fine, transparent grip) to the final coat, especially around pool decks or stairs.
Conclusion
Your patio is the heart of your outdoor living space. Investing in a professional patio clean and seal is the best way to ensure that heart keeps beating beautifully for decades.
At ACME Pressure Washing, we bring over 38 years of experience to every job. We understand the specific challenges of the New Hampshire climate, from the humidity of Nashua to the deep freezes of Milford and Mont Vernon. Our safe, customized, and eco-friendly techniques are designed to protect your home, your family, and the environment.
Don’t let another season of grime and weather take a toll on your stonework. Schedule your professional patio cleaning and sealing today and let us restore the vibrant, “like-new” look your home deserves.